Showing posts with label Calendar Day. Show all posts

Tuesday, September 8, 2015

Happy 1st Day of School!


First Day of School, Cards, acronym, Sassy Designs, Lettering Delights, Fall, Autumn, School
Several Cool Hours Of Ongoing Laughter!!
It's the first day of school in my area, so I made a set of cards for the three of my children who are going back.  My son told me about the acronym "Seven Crappy Hours Of Our Lives", and I knew I had to come up with something better!  Honestly, none of my kids appreciated these cards, but I had a blast making them!

It feels so good to get back into crafting mode, as well as on a schedule again.  I've been quite sick for several weeks, and finally I feel like I'm on the mend.  I've never gotten such a nasty cold in the middle of August!

How about a calendar?  Yup, made a calendar for September, with you guessed it, a back to school theme.
Back to School, September, Fall, Autumn, School, Fancy Pants, Photoshop, Digital, Scrapbooking
Once again I printed it out at 8in.x8in.  Last month I made a stand to put my calendars on in this post.  So far it's working out well and I don't miss having a larger 12in.x12in. calendar.

I found a great place to learn Photoshop techniques called Digitalscrapper.com.  They have plenty of free videos, and you can also sign up for Premier which gives you even more videos as well as digital goodies!  This is where I learned to create folded corners, which I tried out on this calendar.  It's an easy technique, but I want to practice a bit more.

Of course with today being the first day of school, I had to take some pictures of my two Middle Schoolers getting on the bus.  They did not want any part of it, but how could they deprive their mother of a scrapbooking opportunity?  I had already made a layout using files from SVGCuts.com.  Making a digital page this way is so quick and easy!  I put this layout together much the same way I did the one in this post.  Now the memory of my daughter's first day of Middle School and my son's first day of 8th grade is on a page.
First Day of School, Middle School, 2015, SVGCuts.com, Lettering Delights, Lori Whitlock, Photoshop, Digital, Scrapbooking, Fall, Autumn

I decided to include the countdown calendar I made from a previous post in this layout because I wanted to try blending two photos together.  Believe it or not, that was the most time consuming part of creating this page.

That's it for now.  Let me know what you think, or if you have any questions.  Until next time.....
Have a Crafty Day!

Items Used:
 Acronym cards:
 Lunchbag digital paper from Sassy Designs
 Kraft Solid digital paper from Weekend at Home Kit by Kate Hadfield
 Georgia-Pacific white cardstock
 Bebas (Font)
 SNF Sketchy (A+)
 Advert (Font- Are you ready...)

 September Calendar:
 Off To School digital kit from Fancy Pants
 LD Writer's Cramp (Font(colored in)- September, 2015)
 Arial (Font- Numbers)

 Layout:
 Make The Cut
 Miss Baker's Classroom SVG Kit
 School Rules digital collection by Lori Whitlock
 LD Charming Bold (Font-Middle)
 LD Chalky (Font-6th & 8th grade)
 LD Hand (Font- Journaling)


Tuesday, August 11, 2015

Flip Calendar Day: August

calendar, flip calendar, DIY, papercraft, 3D, Bo Bunny, DCWV
Happy August!

An August calendar with a new twist, at least for me.  Since I'm in flip calendar mode, I thought I'd make one for my monthly calendar.  I used to print one 12"x12" calendar every month, but it seems like I'm always running out of ink in my wide format printer!

First, I created my calendar in Photoshop at 12"x12".  Once it was completed I reduced the size to 8"x8" which made it possible to print on my regular size printer.
Digital calendar

I then proceeded to make the flip calendar much the same way as the countdown calendar I made.  Since it's much bigger than that one, I had to use two 12"x12" sheets of cardstock and glue them together to form the base as in these pictures:

calendar, flip calendar, 3D, papercraft, DIY
I scored each sheet at 8.75", folded them and glued one flap on top of the other.  Using my Cinch binding machine, I punched binding holes in the top.  I put patterned paper on the front and backside of the base.  To sturdy up the base I put additional pieces of the same colored cardstock on the interior of it.  Then I bound the top with O rings.  This is how it looks:
calendar, flip calendar, 3D, papercraft, DIY, Bo Bunny, DCWV
I used a removable 8"x8" page protector for the calendar, so I can take it off at any time, or add another if I wish.

I decided it need a little something more, so I added some embellishments and a removable journal card.  The journal card is held on with magnets as I did on my countdown calendar.
Magnets work like a charm!
I can add important dates on the journal card, or anything I want. When the month is over I'll stick it inside the page protector with the calendar.

Thanks for checking out my calendar!  I've made one more, but I'll take a break from flip calendars....for now.

Let me know if you plan to make one of these.  They really are a lot of fun! If you have any questions, feel free to ask in the comments.

Items used:
Photoshop
Cinch Binding Machine
Zutter movable 8x8 page protector
.75" Zutter O Rings
DCWV Sweet Tangerine Stack
Bo Bunny Key Lime and Barefoot&Bliss Digital Collections
Milkshake Font by Laura Worthington

Have a Crafty Day!
 

Wednesday, April 1, 2015

April Calendar

Happy April Fool's Day!  Can't say I'm the sort of person who likes to play jokes on people, nor do I care to have one played on me, so I rarely participate in the festivities of this day.  Of course, with April comes more spring like weather, and that means rain.  Rain to provide ample water for the beautiful flowers.  I've already got daffodils in my yard, courtesy of whoever lived here before me, since I didn't plant them.  And what do you need for rain?  The same thing my April calendar has plenty of, clouds!
digital, calendar, photoshop, april, clouds, spring, rain, Echo Park, Splendid Sunshine, Aishart Extended
Rain, rain DON'T go away, keep watering the flowers!
I actually don't mind the rain with the warmer temperatures.  I can't wait to see the flowers bloom!

To make the clouds for the calendar I selected a cloud from the background paper using the magic wand tool, right clicked, chose layer via copy and filled the cloud with white.  Next I duplicated the cloud several times and lined them up to form the grid.  I also now have the cloud shape that I saved as a .png file for future use.

I chose not to line up the numbers since I wanted them to look random, like they were floating on the clouds.  This made creating the calendar much quicker. 

The raindrops are actually another paper from this collection, I just selected the white background with the magic wand and deleted it, then I changed the blending mode to multiply.

So, what do you think, should the rain go away or stick around?  Let me know what you think!

Hope your day isn't too tricky and Have a Crafty Day!

Items used:
Photoshop
Splendid Sunshine Collection by Echo Park
Aishart Extended (font-days, month, events)
LD Woodland (font- numbers)
 

Monday, March 2, 2015

March Calendar

It's been a very cold winter, and when it's cold, I don't move!  My craft room also gets a bit chilly, so not much happening there!  I did manage to take my computer to my warm and cozy bedroom where I created my March calendar:
Digital, Photoshop, Lettering Delights, Calendar, March, 2015
I had no idea what to do when I started to create this calendar, so I made some rounded rectangles using the shape tool in Photoshop, clipped some papers to them, and went with it!  Since St. Patrick's Day is coming, and green reminds me of warmer times, I went with that theme even though I'm not Irish.  It felt good to finally create something since I've been in hibernation mode for the last month.  My kids have missed so many school days due to snow, they'll probably have to go to school during the summer to make them up!  

I'm so glad digital crafting is an option when I just don't have the desire to paper craft.  Do you ever go into "hibernation mode" when the weather gets bad?  Now that March is here, Spring can't be too far away, right?

Look for signs of Spring and Have A Crafty Day!

Items Used:
Photoshop
Kiss Me I'm Irish Paper Pack
Kiss Me I'm Irish Journal Graphic Set
Kiss Me I'm Irish Cutset
LDJ Leprechaun Hand (font-numbers/days)
LD Cinch (font-events)
Sherina by Artimasa (font-month/year)      

Tuesday, January 13, 2015

A Calendar for January

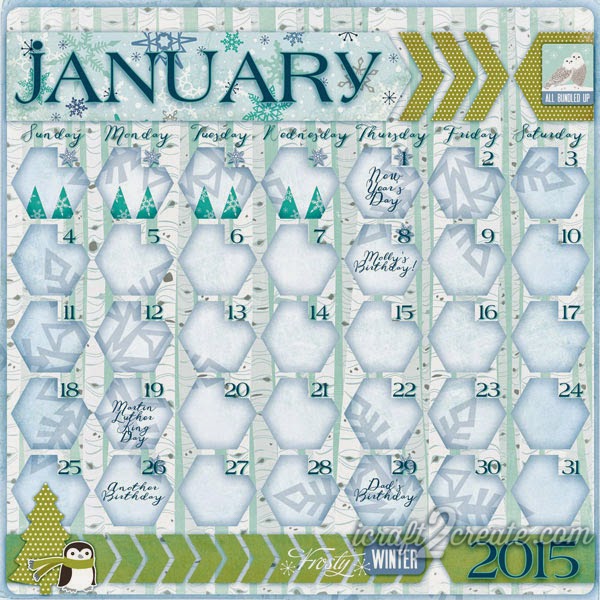
I know it's been too long since I was here last, so let me wish you a very belated Merry Christmas and Happy New Year!  Instead of crafting and blogging I've spent a lot of time getting the chaos creative clutter in my craft room under control.  Since creating digitally only requires the space my computer takes up, I was still able to finish my January calendar.
Digital, Photoshop, Calendar, January, 2015, Winter, Echo Park, Keepin' Cozy, Layout
Chilly!
You might guess that it was verrrry cold when I made this calendar.  In fact, in the twelve years I've lived in my area I've never experienced such low temperatures!  I feel lucky though, as we've not had any snow yet.

I made the template for this calendar back in December using Make The Cut.  I used the basic shapes that are included in the software to create the chevrons and the hexagon grid.  After exporting everything to png, I imported the shapes into Photoshop and clipped some papers from the Keepin' Cozy collection from Echo Park to them.  I created the numbers for the days the same way I created them for my December calendar.  I find it to be way more efficient than doing it in Photoshop.  Making templates ahead of time in Make The Cut also makes the process faster.

I'd love to find an even quicker way to design and create my calendars!  I did come across a site called timeanddate.com, which will create some cool calendars you can use to create a planner or even hang on a wall.  Of course you can't incorporate your own papers and such, but they do offer a lot of options to customize them, and it's free.  I like free.  I'll definitely be using them to create a planner for this year.

Do you like to make your own calendars or are you content to buy them at the store?  Let me know what you think, I'd love to hear your ideas!

Here's what I used:
Make The Cut! Software
Photoshop
Keepin' Cozy Collection from Echo Park
LD Handwritten Greetings Font (Days, events)
LD Hot Betty Font (Month, numbers)

 Keep warm and Have A Crafty Day!

Thursday, December 4, 2014

Calendar Day: December

It's hard to believe December, the last month of the year is here!  This year has gone by so fast, my head is spinning.  

To create my December calendar, I was inspired by Carina Gardner's calendar templates in the Silhouette store.  I decided to create my own in Make The Cut using a doodlebat from Lettering Delights.  Here's what the template looked like:Make The Cut, Lettering Delights, December, Calendar
Here's the finished calendar:
Digital, Photoshop, Calendar, December, Lettering Delights
I clipped two papers to the template and changed the blending mode and opacity on the top paper layer.  I added the ornament to each shape opening and applied a Photoshop style that I found for free online (can't remember where!).  I applied that same style to the month and year letters but tweaked the color a little bit.  I used Make The Cut to create the number grid, which sped up this tedious process (it's my least favorite part of making calendars!).  By typing each week of numbers into the text box with right justify selected, I was able to position the numbers on the ornament template rather quickly.  Gotta love the versatility of Make The Cut, it's not just for cutting!

So, that's my final calendar for 2014.  Now to get the ink for my printer so I can print it out!

Here's what I used:
Make The Cut Software
Photoshop
Lettering Delights:
Christmas Village paper pack
Christmas Village graphic set
Peppermint Holiday graphic set
Christmas Ornaments doodlebat
LD Colorado Slab font (December, numbers)
LDJ Jingleberry font (2014)

Have a Very Merry December and Have A Crafty Day!  

Sunday, November 9, 2014

November Calendar with Reflections Fall by Lori Whitlock

November, the month of gratitude has arrived.  What are you thankful for?  It took me a little time to make this calendar, as I started out using a totally different set of papers than what I ended up with (I thank my very honest daughter for that! LOL).  So without further ado, I present my November calendar.  (Normally I don't speak like Shakespeare, I'm just in that sort of mood!)
Lori Whitlock, Photoshop, Digital, Calendar, Reflections Fall, Aaron Script, November, Autumn, Fall, Thanksgiving


As I mentioned, due to my daughter's honest opinion about the paper I started with to make this calendar, I changed up everything.  I'm glad I did.  I love the browns and the elegant feel of this paper by Lori Whitlock for Echo Park.

I used my own grid from my August 2014 calendar and resized it a bit to fit on this page.  To make the flourishes of the paper go on top of the lower left square and the borders I used the magic wand tool to select the flourishes, then right clicked and chose layer via copy.  Voila!  The square and borders are "sandwiched" between the paper and the flourishes.

I took the opportunity to use Aaron Script, a font I purchased at Mighty Deals a while back but hadn't used.  I love the elegant feel of it, and I didn't even use the extra swashes that came with it.

So that's my elegant November calendar, hope you enjoyed it!  Try using the magic wand tool, and see what you can do!

Supplies Used:
Photoshop
Reflections Fall (Element Pack 1 & Paper Pack)
Aaron Script (font)
Arial (font) 

Have a Happy November and Have a Crafty Day!

Thursday, October 2, 2014

Double Calendar Day and Back To School Luncboxes


Phew.  I made it through the first month of school.  What I didn't make it through was posting here during that time!  Getting used to a schedule after a lazy summer makes transitioning back to a routine a little rough on my kids (not to mention me!).  And now that they're all settled in, I can return to getting my craft on!
  
First up is my September calendar which is now irrelevant, but I thought I'd post it anyway.  Take a look:

Digital, Photoshop, Fall, Autumn, Back to School, Lettering Delights
I decided to mix it up a bit by using mini chalk boards for the grid.  Other than that, there's not much to say about it!

Next up are some lunchboxes I made for my kids from the Miss Baker's Classroom SVG kit from SVGcuts.com.  I wanted to show them my sympathy for their not so sweet return to the books.
SVGCuts, 3D, DCWV
Back to school got ya down?
SVGCuts, 3D, DCWV
Sugar and chocolate are the answer...sweet!
These were so quick to put together, and on each one I put something relating to that particular child.  The computer, piano keys, treble clef, turtle and monkey are all free files from SVGCuts.  You may notice that the turtle one (for my son "turtle boy"), is upside down.  I found myself wondering which way to put the paper, and thought it would be best if it was right side up when my son was going to open it.  After that decision I googled "lunchboxes" and discovered the images on them were the other way. I knew turtle boy wouldn't notice, so I didn't fret too much but I decided to make the other three "properly".  My kids enjoyed the candy and didn't pay much attention to the lunchboxes, but I had fun making them.

And finally, my October calendar:
Digital, Photoshop, Calendar Day, Lori Whitlock, Lettering Delights, Halloween
Spooky!

 I went "off the grid" for this one which allowed the haunted house in the background to be more visible.  Using the black and purple papers from Lori Whitlock's Happy Halloween Collection I played around with the blending modes to get a more grungy effect.  Although the purple paper appears to be below the black, it's actually above it.  Have you ever played with blending modes in Photoshop?  If not, try it sometime, it can change the look of your papers which makes them much more versatile.

Supplies used:
September Calendar
Lori Whitlock's School Days Collection
LD Foundation (Font)
LD Chalky (Font)
Learning Curve (Font)

Lunchboxes
Miss Baker's Classroom SVG Kit
Computer, Piano Keys, Treble Clef, Turtle, Monkey SVGCuts Freebies
DCWV Summer Dream, Edumacation, &Generation Tech Stacks

October Calendar
Lori Whitlock's Happy Halloween Collection
LD Frightmares (Font)
LD Castle (Font)
Burnt Type Alphabet (LD)
 
Thanks for checking out my creations!  I'll be posting some Halloween creations soon. Until then....

Have a Crafty Day!


Friday, August 8, 2014

Calendar Day: Summer Shines On

Wow.  How could the last real month of summer be here so quickly?  August is upon us and thankfully, summer is still shining on in my neck of the woods.  Have you done everything you wanted to do this summer?  I sure haven't, but there's still time, so I've got to get to it!

My digital calendar for August is all about the sunshine and that warm summer feeling.  I created my own template for it in Make The Cut!, saved it as a PNG file and clipped papers to it in Photoshop.  Take a look:
Echo Park, Summer Bliss, Summer, August, Calendar Day, Photoshop, Digital, Gioviale font, Make The Cut
Keep on shinin' on, Summer!
I love the colors of this paper designed by Lori Whitlock for Echo Park.  And yes, I bought it at the One Buck Wednesday Sale at Snap Click Supply Co., where I've bought most of my digital supplies, until recently.  I've since discovered another place I heard about on the SVGCuts Facebook page.  It's called Sassy Designs, and it's where I purchased the "wave" template in the upper three squares of my calendar.  This site has tons of digital paper as well as design elements, album templates, frames, and plenty of freebies.  The last sale everything in the store was .25, and I've read there have been sales where everything was only .12!  Then one day there was a deal where you could get unlimited downloads until the end of December for $25!  Of course I jumped on it, and now every time I go there I feel like I've died and gone to heaven!  If you've never been there you MUST go!  Yeah, I guess I'm a little excited. I just love finding awesome deals!

Supplies used:
Make The Cut! software
Summer Bliss Paper Pack 1
Summer Bliss Element Pack 1
Gioviale font by Laura Worthington
3 Waves Layered Border from Sassy Designs
 
So, that's about it for this calendar day.  I hope your summer keeps shining on and Have A Crafty Day!

 (I'm an affiliate for Make The Cut!, because I love it and you will too!)  

Wednesday, July 2, 2014

Calendar Day: Feeling Patriotic?

What comes to your mind when you think of the word patriotic?  The flag, right?  That's what I thought when I made my calendar for July, the month we in America celebrate the birth of our nation's freedom from tyranny, our Independence Day.  I feel very grateful to live in America, and my calendar shows it!
Jessica Sprague, Lettering Delights, Photoshop, summer, calendar, digital, Snap Click Supply Co, Carina Gardner, patriotic

I used my own calendar grid I created in Make The Cut a while back.  On the top where the striped paper is, I added the words "Land of the free because of the brave" to it, to make it a little more interesting, and because I firmly believe it.  This country is great because of the people who sacrificed and who still sacrifice everything for our freedom!  This calendar puts that thought in the forefront of my mind.

Everything except for the fonts and the overlay of the Declaration of Independence (which are from Lettering Delights) is from Carina Gardner's Americana collection, that I purchased at the One Buck Wednesday sale at Snap Click Supply Co.  Gotta love that sale!

Are you feeling slightly more patriotic after looking at this calendar?  I know I am! 

Here's what I used:
Make The Cut!*
Photoshop
Americana Collection by Carina Gardner
Pride and Freedom Overlay
LD Abe Lincoln
LD Remington Portable

Hope you have a very patriotic Independence Day!

Make something red, white and blue and Have A Crafty Day!
*I'm an affiliate for Make The Cut! because I LOVE it!

Thursday, June 5, 2014

June Calendar Day

Ahhh, sweet June has arrived!  Summer is on its way!  Only a few more days left of school for my kids, and the lazy days of summer will be upon us.  I'm not sure what we're doing this summer, but I'm hoping for plenty of days at the beach!  What will you be up to?

I finally got to work on my June calendar, which to me looks more whimsical than lazy days of summer but here it is:
Jessica Sprague, Photoshop, Digital, Dani Mogstad, calendar day, June, summer
I really like the color scheme of this collection called Snap Happy by Dani Mogstad.  I picked up this digi collection, which has a boat load of images, at Snap Click Supply for 1.99 during the One Buck Wednesday sale.  You should check this sale out if you haven't already, but be careful, it's dangerous to your wallet!  Luckily, DH doesn't read this blog.

Getting back to the calendar, there's only a few things I did differently.  I made my own checkerboard pattern for the grid, and I used the pre made tags included in the collection for the days.  I also used the included alphabet for the title and numbers.  The only place I used a font is for the noted holidays or events for this month.  As much as I like the alphabet for the numbers, it made getting them all lined up a bit more difficult than if I had used a font because each number was on a separate layer.  Of course if I had named the layers as I went along it would have made it much easier!  Hint: Naming layers as you drag them onto your project is a good habit to get into, it helps you keep everything straight as you work.  But you already knew that, didn't you?  Well, let's just say it took me a while to realize it, OK?

Here's what I used in case you like what you see:
Snap Happy Collection by Dani Mogstad
Background Masks Collection by Samantha Walker
TXT Modern Mom (font) 

Hope your summer is a crafty one!
 

Thursday, May 1, 2014

Is It May Already?

Unbelievable.  Yes, that's how I feel.  The month of April went by so fast and what did I post?  Nothing.  Well, I managed to get this calendar done, and I'm glad for that.  I'll make no excuses except to say I haven't really felt inspired lately.  I made myself cut something and put it together today. I'll show that in a future post because there's a bit to say about it, (like the dilemma of version 3) but that's it.  I made a few things this past month, like the 3D letters I made for my son's 17th birthday and a very quick Dr. Who card, but not much more.  Oh, I made a bunny from SVGCuts, and it was cute, until my lovely dog, Molly, decided to eat its head!!  So, yes, I had a headless bunny for Easter.  Thank goodness, May has arrived and with it the warmer weather.  Here's my simple calendar for the month:
Lettering Delights, Bees Knees, May, Calendar Day
 I don't know what made me go with this theme.  It could be all of the bees flying around my house lately.  My kids are deathly afraid of them.  My daughter commented how much she didn't like bees as she watched me create this calendar, but I persevered.  I love the bear at the top and the hexagon shape is one of my favorites.  What's not to love?  If you haven't checked out some of the Lettering Delights graphic sets, you really should, they're so much fun to work with!  Hope you have a great month of May!

Files I used:
Bees Knees Graphic Set
Bees Knees Paper Pack
LD Alley Cat Font
LD Stitch Script Font

Happy May and Have A Crafty Day!

Tuesday, April 1, 2014

Calendar Day: Finally Spring!

Alas, Spring has sprung!  Today was absolutely beautiful.  I've been enjoying the sunshine with my puppy Molly who still has way more energy than I do!  

Believe it or not I actually had my April calendar finished before today.  Not that I've never done that before, but with my sluggish creativity I'm a bit surprised I pulled it off.  Will the world won't end if I don't get my calendar done?  No.  But it was a challenge I gave myself about 3 years ago to create a calendar every month,  and somehow I've managed to do it for much longer than I thought I ever would!  So, without further ado, here's my April 2014 calendar:
 Carina Gardner, Jessica Sprague, Digital, Photoshop, Spring, Sproutlets, Lettering Delights
I love the Spring colors and those Gerber daisies from the Sproutlets Mega Collection by Carina Gardner.  They really cheer me up and make me excited for the warmer weather.  I purchased this collection during the One Buck Wednesday sale at JessicaSprague.com for a dollar.  If you haven't checked that weekly sale out you really should.  There are some great deals to be had on digital papers and elements.  

By the way, you don't have to be a digital scrapper to use digital papers and elements, but you do need software, a printer, and some good white cardstock to use them for physical paper projects.  For software I use Silhouette Studio DE for print and cut projects, and when I'm doing a digital layout I use Photoshop.  To print I use my Epson Stylus Photo 1400 printer that I've had for several years and I love it.  For my calendars I print on regular smooth white cardstock, but if I'm making a print and cut card or 3D project, I use American Crafts white cardstock.  I love the look of the texture with the printing, especially on a card, and it cuts very well in both my Cougar and Cameo.  I enjoy using digital papers since they're reasonably priced, and they don't take up any space in my craft room.  Give them a try on your next project!

Have you ever challenged yourself to inspire your creativity?  Try it out and see if it gets your creative juices flowing!

Here's what I used for this calendar:
Photoshop
Sproutlets MEGA Collection by Carina Gardner
LD Punch Out (Font)
Precious (Font)

Challenge yourself and Have A Crafty Day!

Wednesday, March 12, 2014

Mid March Calendar Day...In Like A Lion!

Yup, March certainly came in like a lion!  We had snow the second day, and where I live if there's snow on the ground the kids don't go to school.  Good grief!  I used to pray for snow days growing up in New York.  We were lucky if we got one!  So far my kids have had a total of 9 snow days!

So, this calendar has been done for over a week now.  I just got to printing it out today.  Then I realized I never posted it!  Guess my mind's been on other things.  So here it is, a combo of what March is all about, St. Patrick's Day and the blustery weather:
Lettering Delights, Calendar Day, March, In Like A Lion Out Like A Lamb, digital
In Like A Lion. Out Like A Lamb!
Instead of the usual calendar grid I decided on the shamrocks, much like the calendar I made last month with hearts I clipped two papers on to a mask from a set by Samantha Walker.  The mask shape made me think of clouds, so it seemed appropriate for this calendar.  Since I don't have the charmed life graphic set the shamrock is in, I imported the pdf that's included in the cut it set into Photoshop and did some copying and pasting to create the rows.  To make the month and year title I created the shadow effect like I showed in this post.  To be honest, this isn't my favorite calendar.  I've got a severe case of the winter blahs.  I am so done with the cold, and it's really getting in the way of my creativity.  I'm hoping this month really does go out like a lamb, I need a taste of spring!  I do love the set In Like A Lion from Lettering Delights that I used, however.  The lion and lamb are so cute!

Speaking of cute, there's something else that's been taking up my time lately, and it is VERY cute.  Stay tuned, I'll be revealing that tomorrow!

Here's what I used for the calendar:
In Like A Lion Cut It Set
In Like A Lion Paper Pack
Charmed Life Cut It Set (Shamrock)
Background Mask Collection by Samantha Walker
SNF Simon Says Font
LDJ Fanciful Font
LD Charming Bold Font

Go out like a lamb and Have A Crafty Day!

Monday, February 3, 2014

Calendar Day...And A Tidbit About Clipping Masks In Photoshop

Ready for Spring yet?  I most certainly am.  Too bad we've got to get through February, and perhaps most of March, before hints of Spring start to show.  That good old groundhog in Punxsutawney, Pennsylvania saw his shadow, which means six more long weeks of winter, ugh.  One holiday that helps ease my winter blues is Valentine's Day, (I think it might have something to do with chocolate) and my calendar for the month is all about it.  Instead of the usual calendar grid, I created rows of hearts for the days and clipped paper to them.  Using clipping masks is one of the most basic things to do in Photoshop, but I think it's tons of fun.  Take any shape you have and make it look the way you want.  This adds value to your cut files because you can convert them into PNG files using Make The Cut! and use them as clipping masks.   Check out how I did this in my calendar below:
Photoshop, Digital, Echo Park, Clipping Masks, Carina Gardner, SVGCuts, Valentines
Hearts A Plenty!
Underneath "February 2014" is a notebook shape that started out as an SVG file from SVGCuts.com.  I imported it into Make The Cut! and saved it as a PNG file.  This is necessary since Photoshop will not import SVG files.  I imported the PNG file into Photoshop and clipped some notebook paper to it by putting the paper above the shape and pressing CTRL+ALT+G.  Make sure your paper is completely covering the shape, it helps to magnify what you're doing to be sure.  Depending on the size of your shape you may want to scale down your paper.  You can move the paper layer separate from the shape layer to get the look you want.  When you're all set, press CTRL+E to merge the two layers together.  You now have your paper in the shape of the notebook paper, pretty cool.  The heart shapes for the days and the pink mat underneath were already PNG files I'd purchased.  The cool thing about those is if I decide I want to cut them, I can convert them into SVG files using Make The Cut! as well.  Now that's thrifty in my book, but then again, I most definitely am not the queen of thriftiness (just ask my husband).  So what do you think?  Have you tried this already?  If not, give it a go and have some fun!  Let me know how you do!

Here's what I used to make my calendar:
Make The Cut! software*
Photoshop
Love Story Paper Pack 2 by Echo Park (Valentine papers)
Love Story Element Pack 2 by Echo Park (Journal cards)
Be Mine Element Pack 2 by Echo Park (XO Border)
Babysitting Adventures Paper Pack by Lettering Delights (Notebook paper)
LD Charming Bold Font
LD Remington Portable Font
LD Jub Jub Font
Notebook SVG from Miss Baker's Classroom SVG Kit
Carina Gardner Photo Masks MEGA Collection 

Whew, that was a long list!  Keep warm, and Have a Crafty Day!

*I am an affiliate for Make The Cut!  Thanks for your support!
 

Thursday, January 2, 2014

Happy New Year!... and My January Calendar

I hope you had an excellent New Year's and you're ready to start a new year!  My main goal this year is to craft more, post more and shop less!  Of course I'll do that tomorrow since I just finished buying a ton of files at Lettering Delights!  Today was the last day of their site wide sale where everything was $1-$2 and on top of that there was a coupon.  I can't resist a sale like that.  The only thing I have a problem with is having so many files to choose from!  As I downloaded my newly purchased files I noticed all the other files I already have and realized I haven't used a lot of them.  I really want to put them to better use, hence the goal to craft more and shop less.  Do any of you have this problem?  I can't be the only one!

Now on to my January calendar which really didn't make much use out of those files, although I did use one to create the grid for this calendar.  I did something I've never done in Photoshop, create a grid with the marquee tool.  The calendar grid from Lettering Delights was a bit thick and I wanted something cleaner looking.  So I imported the grid and drew on top with the marquee tool using the LD grid as a guide.  I think it worked out pretty well.  Of course I added shadows to the January and 2014 using the method I did a tutorial on in this calendar day post.  I really didn't add much else to this calendar as I thought the paper did most of the work.  I liked it so much I didn't want to cover it up!  Snowy and chilly, just what January should be like!  The funny part is in my neck of the woods I haven't seen much snow!  I am truly grateful for that!
So there you have it!  I think I really like how basic this one is.  What do you think?  I did create another one with paper behind the grid, but I think I like this one the best.  Thanks so much for taking a look and reading my rambling!  Feel free to leave a comment!  In case you're interested, here's what I used for this calendar:

Echo Park Winter Wishes Paper Pack 1
SNF Honeycrisp font (January and numbers)
SNF Chantilly Lace font (2014)
Hip Hip Hooray Everyday Calendar cut it project

Tuesday, December 3, 2013

Calendar Day and a Photoshop tidbit I learned

So here's my December calendar!  I can't believe 2013 is coming to an end! (Why are these letters so small?  Beats me!  They get bigger down below!)

While making this calendar I learned something so I thought I'd share it here in case I forget then I can always come back and look!  I learned how to make a shadow in Photoshop for the '2013' on the calendar.  There is more than one way to do it, but I think the way I show here is the easiest for me.  Here are the steps I took:

1.Type the characters and under the layer style menu choose stroke.


 2. Select the size (#pixels) and color of the stroke (this is a matter of preference) and click OK.


 3. Create a new layer and draw a rectangle using the rectangular marquee tool.   Fill the rectangle with the same color as the shadow (teal) using the paintbucket tool.


 4. Put the rectangle layer under the character layer (brown), choose the rectangle and shadow layer (teal), right click and select merge layers.  This allows you to separate the layers in the next step.
 
The rectangle is between the bottom shadow layer and the brown letters
 5. To separate the two shapes select the original characters (brown)with the magic wand, right click and choose layer via cut.


6. To make the shadow a solid shape, first duplicate the original (brown).  Close the eye on the top copy because it is above the original and you won't be able to see it unless you do!  Select the original with the magic wand and color it the same color as the shadow (teal) using the paintbucket.


7.Now all you have to do is select both layers and merge them.


8. You now have your original characters as well as a solid shadow shape!


So, was that too confusing?  I've never really written a "tutorial" before if that's what this is!  I'm sure plenty of you know how to do this (it was a revelation for me!), so this isn't for you!  Actually for me it would have been easier to go into Make The Cut and create a shadow in less than 5 seconds, but I happened to be in Photoshop and I was too lazy to open another program and go through that process.  I don't think it's a bad idea to learn things in more than one program either, makes you super knowledgeable!  In case you're interested here is what I used for my calendar:

Carta Bella Merry and Bright digi papers and elements from Jessica Sprague
Calendar Builder graphic set (grid and 'December') from LD
Fonts (all from Scrapnfonts):
SNFSimonsays
SNFSimonsays3D
SNFSunday

See ya later and just keep crafting!  Of course, you could leave a comment too!
                         

LinkWithin

Related Posts Plugin for WordPress, Blogger...