Showing posts with label Lettering Delights. Show all posts

Tuesday, September 8, 2015

Happy 1st Day of School!


First Day of School, Cards, acronym, Sassy Designs, Lettering Delights, Fall, Autumn, School
Several Cool Hours Of Ongoing Laughter!!
It's the first day of school in my area, so I made a set of cards for the three of my children who are going back.  My son told me about the acronym "Seven Crappy Hours Of Our Lives", and I knew I had to come up with something better!  Honestly, none of my kids appreciated these cards, but I had a blast making them!

It feels so good to get back into crafting mode, as well as on a schedule again.  I've been quite sick for several weeks, and finally I feel like I'm on the mend.  I've never gotten such a nasty cold in the middle of August!

How about a calendar?  Yup, made a calendar for September, with you guessed it, a back to school theme.
Back to School, September, Fall, Autumn, School, Fancy Pants, Photoshop, Digital, Scrapbooking
Once again I printed it out at 8in.x8in.  Last month I made a stand to put my calendars on in this post.  So far it's working out well and I don't miss having a larger 12in.x12in. calendar.

I found a great place to learn Photoshop techniques called Digitalscrapper.com.  They have plenty of free videos, and you can also sign up for Premier which gives you even more videos as well as digital goodies!  This is where I learned to create folded corners, which I tried out on this calendar.  It's an easy technique, but I want to practice a bit more.

Of course with today being the first day of school, I had to take some pictures of my two Middle Schoolers getting on the bus.  They did not want any part of it, but how could they deprive their mother of a scrapbooking opportunity?  I had already made a layout using files from SVGCuts.com.  Making a digital page this way is so quick and easy!  I put this layout together much the same way I did the one in this post.  Now the memory of my daughter's first day of Middle School and my son's first day of 8th grade is on a page.
First Day of School, Middle School, 2015, SVGCuts.com, Lettering Delights, Lori Whitlock, Photoshop, Digital, Scrapbooking, Fall, Autumn

I decided to include the countdown calendar I made from a previous post in this layout because I wanted to try blending two photos together.  Believe it or not, that was the most time consuming part of creating this page.

That's it for now.  Let me know what you think, or if you have any questions.  Until next time.....
Have a Crafty Day!

Items Used:
 Acronym cards:
 Lunchbag digital paper from Sassy Designs
 Kraft Solid digital paper from Weekend at Home Kit by Kate Hadfield
 Georgia-Pacific white cardstock
 Bebas (Font)
 SNF Sketchy (A+)
 Advert (Font- Are you ready...)

 September Calendar:
 Off To School digital kit from Fancy Pants
 LD Writer's Cramp (Font(colored in)- September, 2015)
 Arial (Font- Numbers)

 Layout:
 Make The Cut
 Miss Baker's Classroom SVG Kit
 School Rules digital collection by Lori Whitlock
 LD Charming Bold (Font-Middle)
 LD Chalky (Font-6th & 8th grade)
 LD Hand (Font- Journaling)


Friday, April 3, 2015

Quick Easter Digital Layout Using SVGCuts Files

Want to scrap a quick page of your Easter photos this year?  Want to make your cut files do double duty?  Try converting your cut files into digital format (.png), clip some paper to them, and put together a page in no time!  The easiest way I've found to do this is to get cut files from a page that's already been laid out for you, and Mary at SVGCuts has done just that.  I chose to use the scrapbook page from Poplar Street Tulips to create this layout of Easter 2010.
SVGCuts, Echo Park, Digital, Layout, Easter, Lettering Delights, Poplar Street Tulips, Photoshop
Easter cuteness!
To convert the .svg files I imported them into Make The Cut(MTC), and exported them as .png so I could use them in Photoshop.  There are other programs that will convert files, such as Inkscape, you can even do it in Silhouette Studio, but I find MTC to be the most convenient.

Once the files were in Photoshop, I arranged them on a 12x12 layout just as Mary did.  I clipped some Easter papers to some of the shapes, and applied a glitter style to the egg, the background lace, and the trim at the top of the photo frame.

Since the frame did not have shapes to clip the photos to, I created them using the rectangle tool in Photoshop.  They were sized slightly larger than the openings in the frame, placed underneath the frame, and the photos were clipped to them.

Next I added some drop shadows and two elements not in the SVGCuts file but from the digital collection I used.

And there you have it, a layout that took me under an hour, and that includes the time spent converting the files and deciding what photos and paper to use.

As much as I love making things with paper, when it comes to getting layouts done, I really like going digital.  And when the layout is already done for you (thank you Mary!), it's super fast!  

Making your cut files do double duty as clipping masks makes buying templates unnecessary and stretches your crafting dollar!

So, what do you think?  Have you already done this with your digital scrapbooking?  Would you like to learn more about it?  I'd love to hear, so please leave a comment!

Have a Crafty Day and a Happy Easter!

Items used:
Make The Cut!
Photoshop
Easter Mini Theme by Echo Park
Poplar Street Tulips SVG Kit
LD Those Kids (font-2010)

I'm an affiliate for Make The Cut! and SVGCuts because I LOVE them and you will too!


Wednesday, April 1, 2015

April Calendar

Happy April Fool's Day!  Can't say I'm the sort of person who likes to play jokes on people, nor do I care to have one played on me, so I rarely participate in the festivities of this day.  Of course, with April comes more spring like weather, and that means rain.  Rain to provide ample water for the beautiful flowers.  I've already got daffodils in my yard, courtesy of whoever lived here before me, since I didn't plant them.  And what do you need for rain?  The same thing my April calendar has plenty of, clouds!
digital, calendar, photoshop, april, clouds, spring, rain, Echo Park, Splendid Sunshine, Aishart Extended
Rain, rain DON'T go away, keep watering the flowers!
I actually don't mind the rain with the warmer temperatures.  I can't wait to see the flowers bloom!

To make the clouds for the calendar I selected a cloud from the background paper using the magic wand tool, right clicked, chose layer via copy and filled the cloud with white.  Next I duplicated the cloud several times and lined them up to form the grid.  I also now have the cloud shape that I saved as a .png file for future use.

I chose not to line up the numbers since I wanted them to look random, like they were floating on the clouds.  This made creating the calendar much quicker. 

The raindrops are actually another paper from this collection, I just selected the white background with the magic wand and deleted it, then I changed the blending mode to multiply.

So, what do you think, should the rain go away or stick around?  Let me know what you think!

Hope your day isn't too tricky and Have a Crafty Day!

Items used:
Photoshop
Splendid Sunshine Collection by Echo Park
Aishart Extended (font-days, month, events)
LD Woodland (font- numbers)
 

Monday, March 2, 2015

March Calendar

It's been a very cold winter, and when it's cold, I don't move!  My craft room also gets a bit chilly, so not much happening there!  I did manage to take my computer to my warm and cozy bedroom where I created my March calendar:
Digital, Photoshop, Lettering Delights, Calendar, March, 2015
I had no idea what to do when I started to create this calendar, so I made some rounded rectangles using the shape tool in Photoshop, clipped some papers to them, and went with it!  Since St. Patrick's Day is coming, and green reminds me of warmer times, I went with that theme even though I'm not Irish.  It felt good to finally create something since I've been in hibernation mode for the last month.  My kids have missed so many school days due to snow, they'll probably have to go to school during the summer to make them up!  

I'm so glad digital crafting is an option when I just don't have the desire to paper craft.  Do you ever go into "hibernation mode" when the weather gets bad?  Now that March is here, Spring can't be too far away, right?

Look for signs of Spring and Have A Crafty Day!

Items Used:
Photoshop
Kiss Me I'm Irish Paper Pack
Kiss Me I'm Irish Journal Graphic Set
Kiss Me I'm Irish Cutset
LDJ Leprechaun Hand (font-numbers/days)
LD Cinch (font-events)
Sherina by Artimasa (font-month/year)      

Tuesday, January 13, 2015

A Calendar for January

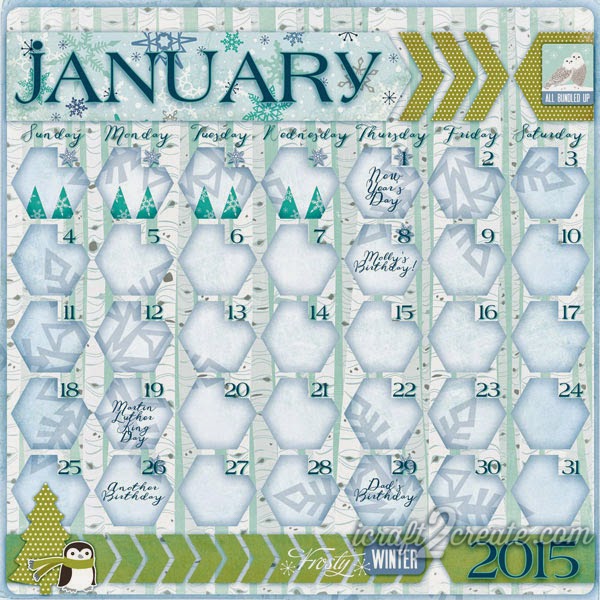
I know it's been too long since I was here last, so let me wish you a very belated Merry Christmas and Happy New Year!  Instead of crafting and blogging I've spent a lot of time getting the chaos creative clutter in my craft room under control.  Since creating digitally only requires the space my computer takes up, I was still able to finish my January calendar.
Digital, Photoshop, Calendar, January, 2015, Winter, Echo Park, Keepin' Cozy, Layout
Chilly!
You might guess that it was verrrry cold when I made this calendar.  In fact, in the twelve years I've lived in my area I've never experienced such low temperatures!  I feel lucky though, as we've not had any snow yet.

I made the template for this calendar back in December using Make The Cut.  I used the basic shapes that are included in the software to create the chevrons and the hexagon grid.  After exporting everything to png, I imported the shapes into Photoshop and clipped some papers from the Keepin' Cozy collection from Echo Park to them.  I created the numbers for the days the same way I created them for my December calendar.  I find it to be way more efficient than doing it in Photoshop.  Making templates ahead of time in Make The Cut also makes the process faster.

I'd love to find an even quicker way to design and create my calendars!  I did come across a site called timeanddate.com, which will create some cool calendars you can use to create a planner or even hang on a wall.  Of course you can't incorporate your own papers and such, but they do offer a lot of options to customize them, and it's free.  I like free.  I'll definitely be using them to create a planner for this year.

Do you like to make your own calendars or are you content to buy them at the store?  Let me know what you think, I'd love to hear your ideas!

Here's what I used:
Make The Cut! Software
Photoshop
Keepin' Cozy Collection from Echo Park
LD Handwritten Greetings Font (Days, events)
LD Hot Betty Font (Month, numbers)

 Keep warm and Have A Crafty Day!

Friday, December 5, 2014

Quick Christmas Countdown Flip Top Advent Calendar

Christmas, Lettering Delights, Advent Calendar

Are you ready for Christmas?  Are your kids anxiously awaiting the arrival of Santa?  Well, if you're a little late creating an advent calendar this year, here's a quick one to whip up so your kids can count the days until the jolly fat man arrives.  My inspiration to make this flip version of an advent calendar came from the flip top calendar Jin at Under A Cherry Tree made back in January 2013.  I made it a little smaller than she does in her tutorial, so I did not use her template to make it.  Using Silhouette Studio DE, I resized the graphics from the Bo Ho Ho Advent set to 2.995"Hx2.245"W and then added a 3.6"Hx2.25"W rectangle  to make room for the binding (no need to trace the graphic).  I decided to let my Cameo cut the binding circles instead of using my Cinch since the width of the cards was making it difficult to get them accurately centered.  This is one page of the graphics in Silhouette Studio:
Silhouette Studio DE, Cameo, Christmas, Advent calendar, Lettering Delights

After setting up each page, I print and cut out the cards.  To create the "days until Christmas" portion I put a paper from the BoHoHo paper pack and the words on a  2.25"Wx1"H rectangle.  Using some chipboard from JoAnn's, I created the calendar base much the same way Jin did, only slightly narrower (11"Lx2.5"W).  I scored at 5", 5.5" and 6".  I used the Cinch to punch the holes at the top for the base since I wasn't cutting it in my Cameo.  After putting all the cards in order I put everything on the O wires and used my Cinch to bind them together.  Now my daughter has a little calendar to put on her nightstand to remind her Santa is coming soon!
Lettering Delights, Under A CherryTree, Advent calendar, Silhouette Studio DE, Cameo

This has to be the quickest advent calendar I've ever made!

I used:
Cameo 
Silhouette Studio DE (Can use the free edition)
Lettering Delights:
BoHoHo Advent set
BoHoHo paper pack
BoHoHo alphabet
LD Charming Bold

Keep counting down and Have a Crafty Day!

Thursday, December 4, 2014

Calendar Day: December

It's hard to believe December, the last month of the year is here!  This year has gone by so fast, my head is spinning.  

To create my December calendar, I was inspired by Carina Gardner's calendar templates in the Silhouette store.  I decided to create my own in Make The Cut using a doodlebat from Lettering Delights.  Here's what the template looked like:Make The Cut, Lettering Delights, December, Calendar
Here's the finished calendar:
Digital, Photoshop, Calendar, December, Lettering Delights
I clipped two papers to the template and changed the blending mode and opacity on the top paper layer.  I added the ornament to each shape opening and applied a Photoshop style that I found for free online (can't remember where!).  I applied that same style to the month and year letters but tweaked the color a little bit.  I used Make The Cut to create the number grid, which sped up this tedious process (it's my least favorite part of making calendars!).  By typing each week of numbers into the text box with right justify selected, I was able to position the numbers on the ornament template rather quickly.  Gotta love the versatility of Make The Cut, it's not just for cutting!

So, that's my final calendar for 2014.  Now to get the ink for my printer so I can print it out!

Here's what I used:
Make The Cut Software
Photoshop
Lettering Delights:
Christmas Village paper pack
Christmas Village graphic set
Peppermint Holiday graphic set
Christmas Ornaments doodlebat
LD Colorado Slab font (December, numbers)
LDJ Jingleberry font (2014)

Have a Very Merry December and Have A Crafty Day!  

Thursday, November 27, 2014

Happy Thanksgiving!

Lettering Delights, Digital, Photoshop, Thanksgiving, November, Fall
Gobble 'til you wobble!
I hope you are enjoying a very Happy Thanksgiving with your friends and family!  I am spending this year at my mother's house where I'll be enjoying her delicious food!    Have a great day!

Files Used:
Giving Thanks graphic set
Fall Forget Me Nots paper pack
Harvesting Memories paper pack
LD Handwritten Greetings font
LD Colorado Slab font

Friday, November 21, 2014

Quick & Easy Cards Using Doodlebats from Lettering Delights

Lettering Delights, doodlebats, dingbats, autumn, thanksgiving, cards
DB Foliage
What are doodlebats, exactly?  If you don't already know, doodlebats, or dingbats as they are also called, are a font that you install on your computer that has pictures for characters instead of letters.  I find I don't use these as much as I should, so I've made some simple cards using some doodlebats from Lettering Delights.  You can also find many on the internet for free.

Using Make The Cut, I created an 8.5 x11 inch rectangle to make a template to create two 4.25 x 5.5 inch cards.  Next I double clicked on the doodlebat image (much easier than having to figure out which letter corresponds to which image), resized it and put it where I wanted it on my template.
Make The Cut, Lettering Delights, Card
Once your cards are set up it's time to print.  If you want to be extra sure it will print correctly on your particular printer, go to File>Print Options then check 'show paper on mat'. This is how it will look:
Make The Cut, Lettering Delights, Card, Printing
For my printer (Epson Artisan 835), I found that choosing the borderless option made true 4.5 x 5.5  cards, which is what I wanted.  Once the cards were printed, I scored down the middle of the paper to create the fold, then cut the paper in half to separate them.  I rounded the corners for a finishing touch.


Here are some of my cards:
DB Giving Thanks & DB Thanksgiving Art

DB Giving Thanks

DB Foliage & DB Greeting Goodies

DB Giving Thanks & DB Thanksgiving Art
I really had a bit of fun making these!  I think I prefer the colored ones to the black ones, but those could be used for the kids to color.  These cards are so quick, they'd be a real time saver if you had to do a bunch, or you could print them out ahead of time and have a card whenever you needed one.

This is just one way to use the doodlebats on your computer.  What other ways can you think of?  I think I may have a few more up my sleeve.  Until then...

Here's what I used:
Make The Cut Software
DB Giving Thanks (Free for Nov. 2014 at Lettering Delights)
DB Thanksgiving Art
DB Foliage
DB Greeting Goodies
LDJ Thankful ('Autumn')
Pristina ('Give Thanks')
American Crafts White Cardstock  

Put those doodlebats to use and Have A Crafty Day!


Monday, October 13, 2014

"Five Minute" Birthday Card

Can you really finish a card in five minutes??  Maybe you can, but I have yet to accomplish that feat, although this birthday card from the Five Minute Cards SVG Kit (from SVGCuts.com) I made for my mother comes close.  Usually the longest part of the creative process for me is choosing the paper to use.  Once my paper was chosen for this card, there were only five cuts to make, but I wasn't done yet!
SVGCuts, DCWV, Birthday Card

This card is only four layers and went together quickly, if you don't count the time I spent obsessively applying foam tape to the back of the flower cut out layer.  You can see what I mean here:
SVGCuts, Birthday Card, DCWV
Just a little bit of foam tape!
Once the foam tape was on, it really did take five minutes to put together!
SVGCuts, Birthday Card, DCWV
For the inside sentiment I used my Silhouette sketch pens and wrote with the Cameo.  I haven't used my thin fonts from Lettering Delights nearly enough, so I was happy for the chance.

Being able to write with your cutting machine comes in real handy when you don't want to stamp or when your printers are out of ink (both are the case for me).  I thought putting the candles on the bottom was also a cute idea, but I'm not sure my mother will appreciate them!  I really enjoyed putting this card together, now all I have to do is get it in the mail!

Supplies Used:
Silhouette Cameo
Silhouette Sketch Pen
DCWV Playtime Stack
Core'dinations Cardstock
LDT Cursive
LDT Cutesie Doodles

Hope you Have A Crafty Day!
*I'm an affiliate for Make The Cut because I LOVE it and you will too! 
  

Saturday, October 11, 2014

DIY Wooden Frames: Halloween Decor


Halloween, SVGCuts, DCWV, Lettering Delights, DIY, frame
Here's some inexpensive Halloween decorating for you.  I bought these wooden picture frames on the cheap from A.C. Moore and Micheal's.  They were only a dollar each, and all the other supplies I used I had on hand.  They're very easy to decorate using some acrylic paint, Halloween scrapbook paper and cutting files (the ones I used are from SVGCuts.com).

The witching hour frame is from Michael's and has a nice shape.  I was surprised it was a dollar until I got it home and discovered the backing was only a piece of cardboard the thickness of a cereal box.  Despite that, it came out fine and who's looking at the back anyway?
Halloween decor, Wooden Frame, Michael's, DCWV, SVGCuts
I painted the frame with glossy black acrylic paint after sanding it with a fine grit sandpaper.  It probably could have used a little more sanding, but I'm not the queen of patience.  After that it came together pretty quick, since the background is simply a page from a mat stack by DCWV.  All I did was cut it down to fit the frame and add a little stickles to the house and flourishes.  The witching hour title is from the same stack and I popped it up using some scrap fun foam.  After adding some cuts from the Gothic Flourishes SVG kit and some bling, it was done.  Here's another view:
Halloween decor, DCWV, SVGCuts, DIY
Next up is the skull frame.  Since this frame had a wooden back, I glued the background paper directly to it.  I painted the frame after sanding it with glossy purple acrylic paint, then I went over the purple with some black glitter paint.  Once it was dry I sanded the edges and corners slightly to make it look distressed.
Halloween Decor, Wooden Frame, AC Moore, SVGCuts, Lettering Delights,DIY
For the skull and bones I put two files from different kits together and created a shadow to glue the cuts to using Make The Cut.  I added a spiderweb corner from Gothic Flourishes (I also adhered a tiny svwarovski crystal to the spider), a flower from Elmhurst Hollow, and a banner from the Christmas Cheer SVG kit (Department Store card).  The bones font is from Lettering Delights, which I blacked out and then did a print and cut in Make The Cut.

Some tips for making these:
  • Be sure to sand your frame with a fine grit sandpaper.  They tend to be a little rough, especially on the edges, which makes painting them a bit more difficult.
  • Make sure to seal everything before putting it on to the frame.  I sealed each paper piece with Mod Podge, and I also sealed the frame with it.  Sealing helps to make it last so you can use it year after year.
  • Use acrylic paint with a glossy finish because it looks nicer than the flat finish.
  • Have fun!
Hope you enjoy decorating some frames of your own.  This is a great craft for any time of the year!

Supplies Used:
Make The Cut*
Silhouette Cameo
Wooden Frames (AC Moore and Michael's)
DCWV Eek-a-Boo & Midnight Spell (mat stack)
Recollections Midnight Magic Pad (glitter paper)
Gothic Flourishes SVG Collection
Elmhurst Hollow SVG Kit (flower)
Catacomb Manor SVG Kit (skull)
Doggie Pals SVG Collection Part II (bones)
Christmas Cheer SVG Kit (banner)
Scrap Bones (font from Lettering Delights)

Have some fun decorating frames and Have A Crafty Day!
*I'm an affiliate for Make The Cut because I LOVE it and you will too! 


Thursday, October 2, 2014

Double Calendar Day and Back To School Luncboxes


Phew.  I made it through the first month of school.  What I didn't make it through was posting here during that time!  Getting used to a schedule after a lazy summer makes transitioning back to a routine a little rough on my kids (not to mention me!).  And now that they're all settled in, I can return to getting my craft on!
  
First up is my September calendar which is now irrelevant, but I thought I'd post it anyway.  Take a look:

Digital, Photoshop, Fall, Autumn, Back to School, Lettering Delights
I decided to mix it up a bit by using mini chalk boards for the grid.  Other than that, there's not much to say about it!

Next up are some lunchboxes I made for my kids from the Miss Baker's Classroom SVG kit from SVGcuts.com.  I wanted to show them my sympathy for their not so sweet return to the books.
SVGCuts, 3D, DCWV
Back to school got ya down?
SVGCuts, 3D, DCWV
Sugar and chocolate are the answer...sweet!
These were so quick to put together, and on each one I put something relating to that particular child.  The computer, piano keys, treble clef, turtle and monkey are all free files from SVGCuts.  You may notice that the turtle one (for my son "turtle boy"), is upside down.  I found myself wondering which way to put the paper, and thought it would be best if it was right side up when my son was going to open it.  After that decision I googled "lunchboxes" and discovered the images on them were the other way. I knew turtle boy wouldn't notice, so I didn't fret too much but I decided to make the other three "properly".  My kids enjoyed the candy and didn't pay much attention to the lunchboxes, but I had fun making them.

And finally, my October calendar:
Digital, Photoshop, Calendar Day, Lori Whitlock, Lettering Delights, Halloween
Spooky!

 I went "off the grid" for this one which allowed the haunted house in the background to be more visible.  Using the black and purple papers from Lori Whitlock's Happy Halloween Collection I played around with the blending modes to get a more grungy effect.  Although the purple paper appears to be below the black, it's actually above it.  Have you ever played with blending modes in Photoshop?  If not, try it sometime, it can change the look of your papers which makes them much more versatile.

Supplies used:
September Calendar
Lori Whitlock's School Days Collection
LD Foundation (Font)
LD Chalky (Font)
Learning Curve (Font)

Lunchboxes
Miss Baker's Classroom SVG Kit
Computer, Piano Keys, Treble Clef, Turtle, Monkey SVGCuts Freebies
DCWV Summer Dream, Edumacation, &Generation Tech Stacks

October Calendar
Lori Whitlock's Happy Halloween Collection
LD Frightmares (Font)
LD Castle (Font)
Burnt Type Alphabet (LD)
 
Thanks for checking out my creations!  I'll be posting some Halloween creations soon. Until then....

Have a Crafty Day!


Thursday, August 14, 2014

How To Fill The Blank Parts of Doodle Style Fonts With Color in Photoshop

Lettering Delights, doodle fonts,Photoshop, digital, tutorial
Back To School?  Ugh!


Fonts.  I have hundreds of them on my computer.  I think I'm obsessed, but that's not important, OK?  What I am interested in is finding fun ways to use them in my crafting. When I saw a doodle font by Lettering Delights that had the blank areas colored in, I was intrigued.  Knowing I have a few fonts like that, I wondered how to fill in those empty spaces with color to get that same effect.  I set out in Photoshop to figure it out, but I didn't have much luck at first.  So, I headed to my trusty Make The Cut!, because I knew I could separate the pieces simply with the click of my mouse.  This method worked, but I really wanted to know how to do it in Photoshop because I knew there had to be a way.  I forgot about it until I stumbled upon a site (while looking for fonts, of course!) called We Lived Happily Ever After, and guess what?  Yup, there was a tutorial for adding color to blank graphics in Photoshop. The very thing I wanted to do but wasn't looking for at the time.  The method described in the tutorial worked fine, however, I thought I'd come up with my own tutorial which addresses one problem I encountered.  If you'd like to fill your doodle style fonts with color, read on:

Photoshop, Digital, Tutorial, Lettering Delights
You don't necessarily have to type your letters in black, it's a matter of preference, really.

Photoshop, Digital, Tutorial, Lettering Delights
Here's where I ran into a problem, I didn't have contiguous and anti-alias checked.  It's important that you do, I discovered.  (Don't ask me why!)

Photoshop, Digital, Tutorial, Lettering Delights
Make sure you have all the areas you don't want colored selected before choosing "select inverse".

Photoshop, Digital, Tutorial, Lettering Delights
Once you have the areas you want colored selected, you can do whatever you want to color them in.  I really love using the gradient tool, it gives a cool effect.  Here's some other examples I created using the gradient tool:

Photoshop, Digital, Lettering Delights

Photoshop, Digital, Lettering Delights

Photoshop, Digital, Lettering Delights


Pretty quick and easy!  I'm so happy I can do this now, and I can't wait to use some colored doodle fonts in my layouts and cards!  Much thanks goes to Hannah at We Lived Happily Ever After!

What do you think?  Are you going to try this?  If you have a question leave it in the comments and I'll do my best to answer it.

Fill your doodle fonts and Have A Crafty Day!

Fonts Used: LD Outline 1, LD Oogly Googly


LinkWithin

Related Posts Plugin for WordPress, Blogger...