Showing posts with label Make The Cut. Show all posts

Tuesday, September 8, 2015

Happy 1st Day of School!


First Day of School, Cards, acronym, Sassy Designs, Lettering Delights, Fall, Autumn, School
Several Cool Hours Of Ongoing Laughter!!
It's the first day of school in my area, so I made a set of cards for the three of my children who are going back.  My son told me about the acronym "Seven Crappy Hours Of Our Lives", and I knew I had to come up with something better!  Honestly, none of my kids appreciated these cards, but I had a blast making them!

It feels so good to get back into crafting mode, as well as on a schedule again.  I've been quite sick for several weeks, and finally I feel like I'm on the mend.  I've never gotten such a nasty cold in the middle of August!

How about a calendar?  Yup, made a calendar for September, with you guessed it, a back to school theme.
Back to School, September, Fall, Autumn, School, Fancy Pants, Photoshop, Digital, Scrapbooking
Once again I printed it out at 8in.x8in.  Last month I made a stand to put my calendars on in this post.  So far it's working out well and I don't miss having a larger 12in.x12in. calendar.

I found a great place to learn Photoshop techniques called Digitalscrapper.com.  They have plenty of free videos, and you can also sign up for Premier which gives you even more videos as well as digital goodies!  This is where I learned to create folded corners, which I tried out on this calendar.  It's an easy technique, but I want to practice a bit more.

Of course with today being the first day of school, I had to take some pictures of my two Middle Schoolers getting on the bus.  They did not want any part of it, but how could they deprive their mother of a scrapbooking opportunity?  I had already made a layout using files from SVGCuts.com.  Making a digital page this way is so quick and easy!  I put this layout together much the same way I did the one in this post.  Now the memory of my daughter's first day of Middle School and my son's first day of 8th grade is on a page.
First Day of School, Middle School, 2015, SVGCuts.com, Lettering Delights, Lori Whitlock, Photoshop, Digital, Scrapbooking, Fall, Autumn

I decided to include the countdown calendar I made from a previous post in this layout because I wanted to try blending two photos together.  Believe it or not, that was the most time consuming part of creating this page.

That's it for now.  Let me know what you think, or if you have any questions.  Until next time.....
Have a Crafty Day!

Items Used:
 Acronym cards:
 Lunchbag digital paper from Sassy Designs
 Kraft Solid digital paper from Weekend at Home Kit by Kate Hadfield
 Georgia-Pacific white cardstock
 Bebas (Font)
 SNF Sketchy (A+)
 Advert (Font- Are you ready...)

 September Calendar:
 Off To School digital kit from Fancy Pants
 LD Writer's Cramp (Font(colored in)- September, 2015)
 Arial (Font- Numbers)

 Layout:
 Make The Cut
 Miss Baker's Classroom SVG Kit
 School Rules digital collection by Lori Whitlock
 LD Charming Bold (Font-Middle)
 LD Chalky (Font-6th & 8th grade)
 LD Hand (Font- Journaling)


Saturday, August 15, 2015

5 Cute Back to School Projects from SVGCuts

Back to School, SVGCuts.com, Fall, Autumn, DIY, papercrafts,school
Do you have kids going back to school this week?  Do you know any teachers?  Why not try some of these cute back to school themed projects from SVGCuts.com?  You'll definitely have fun making them! 

I will list the projects from simplest to more difficult to create.  This is purely subjective, as some of you may find some things harder and others easier than I did.  Even when I had a bit of difficulty putting things together, I was happy with the outcome, so give them a try!  All of the links to the kits these projects are in will be listed at the end.

Every one can use a card, even if it isn't for back to school but to simply send a greeting to your child's teacher or someone you know who's a teacher.
Back to School, SVGCuts.com, apple, school, fall, autumn
This card was really quick to put together.  Just add a little embossing and it goes a long way!

Believe it or not, this backpack took less than five minutes to assemble!
Back to School, SVGCuts.com, school, fall, autumn, backpack, papercrafts, DIY
My daughter suggested I needed something to go inside, and what did she suggest?  Books, of course!  I made some mini notebooks to stick inside, but you could fill it with any goodies for your child.

Here's a nice gift any teacher would appreciate!
Back to School, SVGCuts.com, cards, stationery set, papercrafts, DIY, school, fall, autumn

This project was quite easy, but making the cards was a little time consuming, so don't start this if you're in a rush!  I made six notecards and six envelopes suitable for a teacher to send a note.  Add your teacher's name to the front and you have a super personalized gift!


Planning to give your teacher or student a little something that needs a box?  This one is perfect!
Back to School, SVGCuts.com, apple, fall, autumn, school, teacher gift, papercrafts, DIY

This adorable apple opens up so you can place a sweet gift inside!  Since this one is three dimensional, it takes a little more patience to put together.  It is still pretty easy, and the wow factor is awesome!  The main thing to remember is to take your time while gluing, holding each piece and letting the glue dry as you go.

Last but not least, another gift box any student or teacher would love.
Back to School, SVGCuts.com, school, pencil, papercrafts, DIY, fall, autumn, teacher, student
Of all the projects listed here, the pencil box was the most difficult for me to put together.  Putting the wood part onto the pencil was a challenge, but overall I'm very happy with the outcome.  

I added a scalloped edge for a little more embellishment at the top since I didn't want to use the numbers that came with this file.  The black part of the apple on the front is cut from chalkboard paper which was perfect for writing the sentiment.

So, that's it!  Five really cute projects you'll have a blast making for a teacher or student!  Imagine how impressed the recipients will be!

Which projects are you making for back to school this year?  Please tell me about them!  If you have any questions about the projects listed here, ask in the comments and I'll do my best to answer!

SVG Kits Used: 
Back To School (Books on front of backpack)
Back to the Books (Backpack, Cards for teacher)
Miss Baker's Classroom (Apple)
School Days (Apple card, Pencil box)

Have a Crafty Day! 

*I'm an affiliate for SVGCuts because I love them and YOU will too!
 

Sunday, August 2, 2015

Tips for Tackling the Pagoda from SVGCuts-Part 2

SVGCuts, Spring Blossoms SVG Kit, papercraft, 3D, Silhouette Cameo, Tutorial
This is the second part of my Tips for Tackling the Pagoda from SVGCuts.  If you missed the first part please check it out here before reading on.

Are you ready to put your pagoda together and relish in your crafty goodness?  Of course you are!  You've completed Phase One and Two, now read on for Phase Three.

Phase Three: Assembly
  • Clear your craft area of unnecessary items.  You really do need a clean table with plenty of space for all of your pieces and supplies.  If your work area is too small or filled with unrelated items, you risk losing pieces and slowing down your workflow.  Some of you may be lucky enough to have a tidy craft room where this might not be a problem, but if not, clear off that dining room table!
  • Gather all of your supplies.  Make sure you have everything you need so you can keep everything going smoothly.  Here's a list of the things you may want to have when doing a project like this:
          • Glue- I use Scotch Quick Dry
          • Glue dots- To adhere embellishments
          • Scrap paper- To protect your craft area from glue.
          • Baby wipes- To get the glue off your fingers!
          • Paper towel- To dry your hands. Don't get your paper wet!
          • Pick- To poke out the little pieces in the intricate cuts.
          • Mini Clothespins- To hold corners together while the glue dries. (See Below).
          • Florist foam or foam board- To add support. (See Below).
          • Chipboard or cereal box- To add support. (See Below).
          • Embellishments 
  • Lay out only the pieces for the part you're creating.  Don't lay out all of your pieces at once, they WILL get lost!  Take out the pieces just for the roof, or the base, or whichever part you want to start with.
  • Put on the decorative panels first, if possible.  If you can put the panels on before assembling, it is so much easier.  In some cases it may not be possible, such as on the roof where the curve needs to be established beforehand.  You should also put any vellum pieces on before assembly, or you won't be putting them on at all!
  • Consult the assembly video.  This will help you determine whether or not to put the decorative panels on first.  It's also helpful to watch while you're assembling since you can pause and rewind as needed.
  • Add some florist foam to the inside of the base pieces.  It might seem strange, but florist foam prevents the base pieces from caving in.  There are box files for the inside of the base pieces which are meant to give additional support, but adding something sturdy inside them is even better.  An alternative I learned about on the SVGCuts Facebook page is to use foam board. (Thank you, Ron Gutman!).
  • Use mini clothespins to hold corners together.  This is useful when you don't want to sit and wait for the glue to dry.  Clip the corners and move on!  Using clothespins also keeps your fingers from getting stuck to the paper. Clothespins are also handy for getting into places where your fingers might not fit easily.  Here's how you can use them on the roof of your pagoda:
    SVGCuts, Pagoda, Spring Blossoms SVG Kit, tutorial

       You can also use them on the base pieces like this:
SVGCuts, Pagoda, Spring Blossoms SVG Kit, American Crafts, Tutorial, Silhouette Cameo, papercraft, 3D

  •  Use chipboard to add more support to the walls.  Adding strips of chipboard or even cardboard from a cereal box along the top of the inside of the walls prevents them from bowing in.  You can cover them in some of your patterned paper to make it look more appealing:
    SVGCuts, Spring Blossoms SVG Kit, papercraft, 3D, Silhouette Cameo, Tutorial, American Crafts
    It isn't shown in the picture, but you can also install a chipboard floor to add to the sturdiness.
  • Add embellishments.  Have fun putting your own style into your creation.  There really aren't any rules, just go with what appeals to you or what you know will appeal to the person you may be giving it to.  Keeping with the theme and colors of your paper will give your project a unified feeling.  To attach embellishments like the flowers, you can use glue dots.  Self-adhesive embellishments are also quite handy and there are plenty to choose from at your local craft store or online.
  • Enjoy and share your awesome creation!  Yeah, like I needed to tell you that!  Check out my "awesome" creation:
    SVGCuts, Make The Cut, Silhouette Cameo, American Crafts, SEI, Tutorial, 3D, papercraft
I really enjoyed creating this pagoda, and I'm very happy with the results.  Once I broke the process down into smaller parts, it didn't seem so daunting.  A little planning goes a long way when it comes to making these projects!  

I'm equally delighted to share the tips I discovered while creating the pagoda, and I hope they're helpful to you.  If you have any questions or additional tips to add, tell me about it in the comments.  I'd also love to see your creations, so leave a link!  Thanks so much for taking the time to read my tips!

Have a Crafty Day!

Items used:
Make The Cut!
Silhouette Cameo
Spring Blossoms SVG Kit
American Crafts Cardstock
Sunny Day Collection by SEI
 

Saturday, August 1, 2015

Tips for Tackling the Pagoda from SVGCuts-Part 1

SVGCuts, Make The Cut, Silhouette Cameo, 3D, papercraft, scrapbooking, tutorial
Did you guess correctly?
If you read my last post (from 3 months ago!) you may have gotten a clue that the pagoda was my craft in progress!

You've  gotta love the many 3D paper projects Mary at SVGCuts.com has designed.  She really outdid herself with the pagoda from the Spring Blossoms SVG Kit, and when I saw it I knew I had to make it. Then I started thinking about how many pieces there were, and I got so overwhelmed I almost gave up. Just figuring out what paper to use for each piece might be a project in itself!

After taking a deep breath, I thought: What do you do when a project seems too big to handle?  You break it down into smaller, more manageable parts.  This made me breathe easier, and if you've ever felt this way, take a deep breath and read on for tips that will help you successfully tackle the pagoda, or any large 3D paper project.

I've broken up these tips into three phases: choosing papers, cutting, and assembly. The assembly phase will be posted tomorrow, so as not to overwhelm you!

Phase One: Choosing Papers
  • Use the K.I.S.S. (Keep It Simple Stupid) method. Stick to one patterned paper collection.  Doing this makes putting patterns together a no brainer since they're all meant to go together.  The only other paper you'll need are solids that match the colors in the patterned paper.
  • Your solid paper should be a strong cardstock.  At least 80lb.  American Crafts and Bazzill cut well and are sturdy.
  • Watch Mary's assembly tutorial before you choose any papers.  This may seem backwards, but seeing the pieces and where they will go helps you decide which paper to use on which piece.
  • Consult the PDF included with the project files. Each of the pieces are grouped together in the PDF by color.  This will aid you in knowing which pieces should be the same color.
  • Scale your patterns appropriately.  The larger the piece, the larger the pattern can be on the paper.  Use smaller scaled patterns for the smaller pieces.  (On my pagoda I used a large flower pattern for the roof panels and smaller patterns on the side panels).
  • Remember, there is no right or wrong!  This is not a test, so unleash some of your creativity when deciding what goes where. (I have a lot of trouble remembering this!).
  • Label your papers with the SVG file name they will be used for with sticky notes.  This avoids confusion later on when you're cutting and it will help you remember if you have to put your papers aside before you go to cut.
Phase Two: Cutting
  • Make sure you have a sharp blade in your machine and sticky mats on hand.  This seems obvious, but I've certainly started projects without even considering this!  There is nothing more annoying than being in the middle of a project and getting awful cuts because your blade is dull or your paper isn't sticking to the mat.  You don't want to have to cut something more than once.
  • Having two mats on hand can make your workflow quicker.  You can be removing shapes or applying paper on another mat while other pieces are being cut in your machine.
  • Organize your cuts in your software.  For this project I used my favorite cutting program Make The Cut.  I put all the cuts that were the same color together on the same layer.  If I needed more than one sheet per color I placed the shapes on multiple layers.  I then placed the layers in order from the heaviest paper weight to the lightest and cut them accordingly.  This keeps the need for changing settings on your machine to a minimum.  I also labeled each of the layers with the appropriate paper color to avoid any confusion about which paper to use.
  • As you remove your shapes from your mat, put them in a sealable plastic bag.  How many times have you lost a piece and had to cut it again?  This is especially true for the smaller pieces as they are easily lost.  It's also helpful if you have to leave your project temporarily because life gets in the way.  (Of course that never happens when you're crafting!).
Phew! So far, so good.  You've got your papers picked out, your shapes imported and organized in your software, you've cut them, and now they're neatly stored and ready to assemble.  It's time to take a breather!

Do you have any questions about any of these tips?  Please let me know.  And if you have anything to add to this list, I'd love to read them in the comments!

Tomorrow will be Phase Three: Assembly. See you then!
Items Used:
Silhouette Cameo
American Crafts Cardstock
Sunny Day Collection by SEI

Have a Crafty Day!   


Thursday, April 23, 2015

Have You Seen It? The SVG Cuts Spring Blossoms SVG Kit Rocks!

Have you seen the new kit from SVGCuts.com?  It is awesome!  Just in time for Spring, an Asian themed kit complete with a pagoda!  Check out the new Spring Blossoms SVG Kit!
SVGCuts, scrapbooking, spring, asian, 3D papercrafts, pagoda, lantern, cards
 This kit is FREE with a purchase of $9.98 or more!  You save $6.99!

 I am in love with the pagoda and the lantern.  In fact, I've already made both of them, but I'm only going to show the lantern today.  Here's my version of it, which looks eerily similar (lol, yeah no creative license taken here!) to the one Mary from SVGCuts made.
SVGCuts, Spring Blossoms, 3D, papercrafts, scrapbooking, Bazzil, DCWV
 I didn't use the same paper as Mary, since from what I've heard it's difficult to find.  Of course, any excuse to buy more paper is fine with me! 

This lantern is very simple, but I love the clean look of it and I can't wait to put it up on my mantle in the living room with a tea light this evening.  

Here's another view.
SVGCuts, Spring Blossoms SVG Kit, lantern, Asian, spring, 3D, papercrafts, DCWV, Bazzill
 I can't wait to show you the pagoda I made, so stop by again and in the meantime I'd love to know what you think of my lantern!  

What will you make from the Spring Blossoms SVG Kit?  Be sure to tell me in the comments!

Have a Crafty Day!

Items used:
Spring Blossoms SVG Kit
Silhouette Cameo
Make The Cut! software
DCWV Wind Butterfly from Far East Stack
Bazzill Basics cardstock

I'm an affiliate for SVGCuts.com and Make The Cut! because I LOVE them and you will too! 
 

Friday, April 3, 2015

Quick Easter Digital Layout Using SVGCuts Files

Want to scrap a quick page of your Easter photos this year?  Want to make your cut files do double duty?  Try converting your cut files into digital format (.png), clip some paper to them, and put together a page in no time!  The easiest way I've found to do this is to get cut files from a page that's already been laid out for you, and Mary at SVGCuts has done just that.  I chose to use the scrapbook page from Poplar Street Tulips to create this layout of Easter 2010.
SVGCuts, Echo Park, Digital, Layout, Easter, Lettering Delights, Poplar Street Tulips, Photoshop
Easter cuteness!
To convert the .svg files I imported them into Make The Cut(MTC), and exported them as .png so I could use them in Photoshop.  There are other programs that will convert files, such as Inkscape, you can even do it in Silhouette Studio, but I find MTC to be the most convenient.

Once the files were in Photoshop, I arranged them on a 12x12 layout just as Mary did.  I clipped some Easter papers to some of the shapes, and applied a glitter style to the egg, the background lace, and the trim at the top of the photo frame.

Since the frame did not have shapes to clip the photos to, I created them using the rectangle tool in Photoshop.  They were sized slightly larger than the openings in the frame, placed underneath the frame, and the photos were clipped to them.

Next I added some drop shadows and two elements not in the SVGCuts file but from the digital collection I used.

And there you have it, a layout that took me under an hour, and that includes the time spent converting the files and deciding what photos and paper to use.

As much as I love making things with paper, when it comes to getting layouts done, I really like going digital.  And when the layout is already done for you (thank you Mary!), it's super fast!  

Making your cut files do double duty as clipping masks makes buying templates unnecessary and stretches your crafting dollar!

So, what do you think?  Have you already done this with your digital scrapbooking?  Would you like to learn more about it?  I'd love to hear, so please leave a comment!

Have a Crafty Day and a Happy Easter!

Items used:
Make The Cut!
Photoshop
Easter Mini Theme by Echo Park
Poplar Street Tulips SVG Kit
LD Those Kids (font-2010)

I'm an affiliate for Make The Cut! and SVGCuts because I LOVE them and you will too!


Friday, March 20, 2015

A Little Late, But Still Lucky!

St. Patrick's Day, SVG Cuts, beer mug, beer bottle
A little late!!
Yeah, I know, it's not St. Patrick's Day, it's the first day of Spring, but I still wanted to share my St. Pats Day projects, however late it may be.  I mentioned in my last post that I couldn't wait to make the beer mug from the Feeling Lucky SVG kit and the beer bottle from the Surf Shack SVG kit (links below).  I wasn't lying, so here they are!
SVG Cuts, Feelin' Lucky, Surf Shack, St. Patrick's Day, Silhouette Cameo, Core'dinations
Drink some beer and be of good cheer!
I truly enjoyed making that beer mug.  It was fast and simple, and it looks awesome!  I plan to make more in different colors, as this is a versatile file and can be used for many occasions such as birthdays and Father's Day.

The beer bottle was a bit more challenging, but very doable.  It's just a matter of taking your time and giving the glue a chance to dry.  I think I was a little off on the top because it does not want to fit over the bottom!  I WILL be making another one, but it will be a replica of my favorite beer and hopefully will fit better.

Believe it or not, I used Christmas paper for the green patterned paper since I don't own one single sheet of St. Patrick's Day paper!  It's hard to believe!  My husband was in shock!

I created and then print and cut the labels in MTC out of sticker paper I got from Staples.  For some reason, I had trouble getting my Cameo to read the registration marks so I decided to just let it cut. Big mistake.  As you may be able to tell, they're a little off.  I had to cut the green border around the one on the mug with scissors and put some cardstock behind it to make it look right.  Anybody else who uses MTC with their Cameo have this problem?  I usually don't, so any tips would be appreciated.

Here's wishing you a very belated Happy St. Patrick's Day as well as a timely Happy Spring!

What Spring projects are you working on?  Love to hear from you in the comments!

Yay for Spring and Have a Crafty Day!!

Items used:
Make The Cut! software
Silhouette Cameo
Feeling Lucky SVG Kit (beer mug, rainbow, shamrock)
Surf Shack SVG Kit (beer bottle)
Celtic Card SVG Kit (Luck O' the Irish to Ye)
Honeyscript font (Lucky, Beer)
Impact font (CHEER)
American Crafts cardstock
Core'dinations cardstock
Staples white sticker paper

(I am an affiliate for both Make The Cut! and SVGCuts.com because I LOVE both of them and you will too!)


Tuesday, January 13, 2015

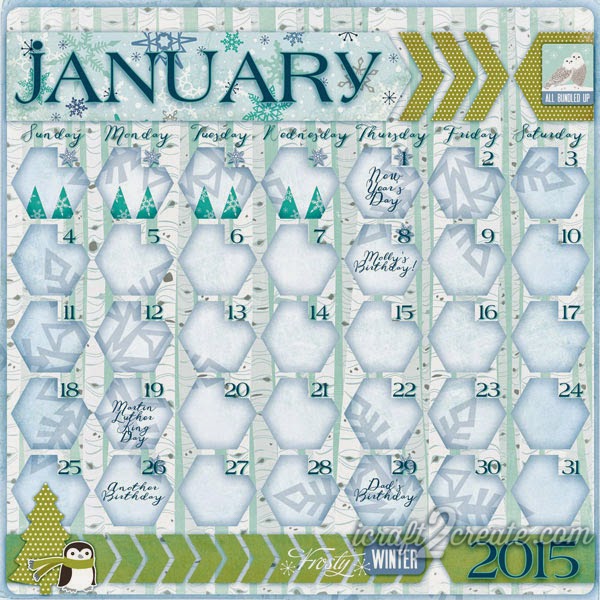
A Calendar for January

I know it's been too long since I was here last, so let me wish you a very belated Merry Christmas and Happy New Year!  Instead of crafting and blogging I've spent a lot of time getting the chaos creative clutter in my craft room under control.  Since creating digitally only requires the space my computer takes up, I was still able to finish my January calendar.
Digital, Photoshop, Calendar, January, 2015, Winter, Echo Park, Keepin' Cozy, Layout
Chilly!
You might guess that it was verrrry cold when I made this calendar.  In fact, in the twelve years I've lived in my area I've never experienced such low temperatures!  I feel lucky though, as we've not had any snow yet.

I made the template for this calendar back in December using Make The Cut.  I used the basic shapes that are included in the software to create the chevrons and the hexagon grid.  After exporting everything to png, I imported the shapes into Photoshop and clipped some papers from the Keepin' Cozy collection from Echo Park to them.  I created the numbers for the days the same way I created them for my December calendar.  I find it to be way more efficient than doing it in Photoshop.  Making templates ahead of time in Make The Cut also makes the process faster.

I'd love to find an even quicker way to design and create my calendars!  I did come across a site called timeanddate.com, which will create some cool calendars you can use to create a planner or even hang on a wall.  Of course you can't incorporate your own papers and such, but they do offer a lot of options to customize them, and it's free.  I like free.  I'll definitely be using them to create a planner for this year.

Do you like to make your own calendars or are you content to buy them at the store?  Let me know what you think, I'd love to hear your ideas!

Here's what I used:
Make The Cut! Software
Photoshop
Keepin' Cozy Collection from Echo Park
LD Handwritten Greetings Font (Days, events)
LD Hot Betty Font (Month, numbers)

 Keep warm and Have A Crafty Day!

Thursday, December 4, 2014

Calendar Day: December

It's hard to believe December, the last month of the year is here!  This year has gone by so fast, my head is spinning.  

To create my December calendar, I was inspired by Carina Gardner's calendar templates in the Silhouette store.  I decided to create my own in Make The Cut using a doodlebat from Lettering Delights.  Here's what the template looked like:Make The Cut, Lettering Delights, December, Calendar
Here's the finished calendar:
Digital, Photoshop, Calendar, December, Lettering Delights
I clipped two papers to the template and changed the blending mode and opacity on the top paper layer.  I added the ornament to each shape opening and applied a Photoshop style that I found for free online (can't remember where!).  I applied that same style to the month and year letters but tweaked the color a little bit.  I used Make The Cut to create the number grid, which sped up this tedious process (it's my least favorite part of making calendars!).  By typing each week of numbers into the text box with right justify selected, I was able to position the numbers on the ornament template rather quickly.  Gotta love the versatility of Make The Cut, it's not just for cutting!

So, that's my final calendar for 2014.  Now to get the ink for my printer so I can print it out!

Here's what I used:
Make The Cut Software
Photoshop
Lettering Delights:
Christmas Village paper pack
Christmas Village graphic set
Peppermint Holiday graphic set
Christmas Ornaments doodlebat
LD Colorado Slab font (December, numbers)
LDJ Jingleberry font (2014)

Have a Very Merry December and Have A Crafty Day!  

Friday, November 21, 2014

Quick & Easy Cards Using Doodlebats from Lettering Delights

Lettering Delights, doodlebats, dingbats, autumn, thanksgiving, cards
DB Foliage
What are doodlebats, exactly?  If you don't already know, doodlebats, or dingbats as they are also called, are a font that you install on your computer that has pictures for characters instead of letters.  I find I don't use these as much as I should, so I've made some simple cards using some doodlebats from Lettering Delights.  You can also find many on the internet for free.

Using Make The Cut, I created an 8.5 x11 inch rectangle to make a template to create two 4.25 x 5.5 inch cards.  Next I double clicked on the doodlebat image (much easier than having to figure out which letter corresponds to which image), resized it and put it where I wanted it on my template.
Make The Cut, Lettering Delights, Card
Once your cards are set up it's time to print.  If you want to be extra sure it will print correctly on your particular printer, go to File>Print Options then check 'show paper on mat'. This is how it will look:
Make The Cut, Lettering Delights, Card, Printing
For my printer (Epson Artisan 835), I found that choosing the borderless option made true 4.5 x 5.5  cards, which is what I wanted.  Once the cards were printed, I scored down the middle of the paper to create the fold, then cut the paper in half to separate them.  I rounded the corners for a finishing touch.


Here are some of my cards:
DB Giving Thanks & DB Thanksgiving Art

DB Giving Thanks

DB Foliage & DB Greeting Goodies

DB Giving Thanks & DB Thanksgiving Art
I really had a bit of fun making these!  I think I prefer the colored ones to the black ones, but those could be used for the kids to color.  These cards are so quick, they'd be a real time saver if you had to do a bunch, or you could print them out ahead of time and have a card whenever you needed one.

This is just one way to use the doodlebats on your computer.  What other ways can you think of?  I think I may have a few more up my sleeve.  Until then...

Here's what I used:
Make The Cut Software
DB Giving Thanks (Free for Nov. 2014 at Lettering Delights)
DB Thanksgiving Art
DB Foliage
DB Greeting Goodies
LDJ Thankful ('Autumn')
Pristina ('Give Thanks')
American Crafts White Cardstock  

Put those doodlebats to use and Have A Crafty Day!


Monday, October 13, 2014

"Five Minute" Birthday Card

Can you really finish a card in five minutes??  Maybe you can, but I have yet to accomplish that feat, although this birthday card from the Five Minute Cards SVG Kit (from SVGCuts.com) I made for my mother comes close.  Usually the longest part of the creative process for me is choosing the paper to use.  Once my paper was chosen for this card, there were only five cuts to make, but I wasn't done yet!
SVGCuts, DCWV, Birthday Card

This card is only four layers and went together quickly, if you don't count the time I spent obsessively applying foam tape to the back of the flower cut out layer.  You can see what I mean here:
SVGCuts, Birthday Card, DCWV
Just a little bit of foam tape!
Once the foam tape was on, it really did take five minutes to put together!
SVGCuts, Birthday Card, DCWV
For the inside sentiment I used my Silhouette sketch pens and wrote with the Cameo.  I haven't used my thin fonts from Lettering Delights nearly enough, so I was happy for the chance.

Being able to write with your cutting machine comes in real handy when you don't want to stamp or when your printers are out of ink (both are the case for me).  I thought putting the candles on the bottom was also a cute idea, but I'm not sure my mother will appreciate them!  I really enjoyed putting this card together, now all I have to do is get it in the mail!

Supplies Used:
Silhouette Cameo
Silhouette Sketch Pen
DCWV Playtime Stack
Core'dinations Cardstock
LDT Cursive
LDT Cutesie Doodles

Hope you Have A Crafty Day!
*I'm an affiliate for Make The Cut because I LOVE it and you will too! 
  

LinkWithin

Related Posts Plugin for WordPress, Blogger...