Showing posts with label American Crafts. Show all posts

Sunday, August 2, 2015

Tips for Tackling the Pagoda from SVGCuts-Part 2

SVGCuts, Spring Blossoms SVG Kit, papercraft, 3D, Silhouette Cameo, Tutorial
This is the second part of my Tips for Tackling the Pagoda from SVGCuts.  If you missed the first part please check it out here before reading on.

Are you ready to put your pagoda together and relish in your crafty goodness?  Of course you are!  You've completed Phase One and Two, now read on for Phase Three.

Phase Three: Assembly
  • Clear your craft area of unnecessary items.  You really do need a clean table with plenty of space for all of your pieces and supplies.  If your work area is too small or filled with unrelated items, you risk losing pieces and slowing down your workflow.  Some of you may be lucky enough to have a tidy craft room where this might not be a problem, but if not, clear off that dining room table!
  • Gather all of your supplies.  Make sure you have everything you need so you can keep everything going smoothly.  Here's a list of the things you may want to have when doing a project like this:
          • Glue- I use Scotch Quick Dry
          • Glue dots- To adhere embellishments
          • Scrap paper- To protect your craft area from glue.
          • Baby wipes- To get the glue off your fingers!
          • Paper towel- To dry your hands. Don't get your paper wet!
          • Pick- To poke out the little pieces in the intricate cuts.
          • Mini Clothespins- To hold corners together while the glue dries. (See Below).
          • Florist foam or foam board- To add support. (See Below).
          • Chipboard or cereal box- To add support. (See Below).
          • Embellishments 
  • Lay out only the pieces for the part you're creating.  Don't lay out all of your pieces at once, they WILL get lost!  Take out the pieces just for the roof, or the base, or whichever part you want to start with.
  • Put on the decorative panels first, if possible.  If you can put the panels on before assembling, it is so much easier.  In some cases it may not be possible, such as on the roof where the curve needs to be established beforehand.  You should also put any vellum pieces on before assembly, or you won't be putting them on at all!
  • Consult the assembly video.  This will help you determine whether or not to put the decorative panels on first.  It's also helpful to watch while you're assembling since you can pause and rewind as needed.
  • Add some florist foam to the inside of the base pieces.  It might seem strange, but florist foam prevents the base pieces from caving in.  There are box files for the inside of the base pieces which are meant to give additional support, but adding something sturdy inside them is even better.  An alternative I learned about on the SVGCuts Facebook page is to use foam board. (Thank you, Ron Gutman!).
  • Use mini clothespins to hold corners together.  This is useful when you don't want to sit and wait for the glue to dry.  Clip the corners and move on!  Using clothespins also keeps your fingers from getting stuck to the paper. Clothespins are also handy for getting into places where your fingers might not fit easily.  Here's how you can use them on the roof of your pagoda:
    SVGCuts, Pagoda, Spring Blossoms SVG Kit, tutorial

       You can also use them on the base pieces like this:
SVGCuts, Pagoda, Spring Blossoms SVG Kit, American Crafts, Tutorial, Silhouette Cameo, papercraft, 3D

  •  Use chipboard to add more support to the walls.  Adding strips of chipboard or even cardboard from a cereal box along the top of the inside of the walls prevents them from bowing in.  You can cover them in some of your patterned paper to make it look more appealing:
    SVGCuts, Spring Blossoms SVG Kit, papercraft, 3D, Silhouette Cameo, Tutorial, American Crafts
    It isn't shown in the picture, but you can also install a chipboard floor to add to the sturdiness.
  • Add embellishments.  Have fun putting your own style into your creation.  There really aren't any rules, just go with what appeals to you or what you know will appeal to the person you may be giving it to.  Keeping with the theme and colors of your paper will give your project a unified feeling.  To attach embellishments like the flowers, you can use glue dots.  Self-adhesive embellishments are also quite handy and there are plenty to choose from at your local craft store or online.
  • Enjoy and share your awesome creation!  Yeah, like I needed to tell you that!  Check out my "awesome" creation:
    SVGCuts, Make The Cut, Silhouette Cameo, American Crafts, SEI, Tutorial, 3D, papercraft
I really enjoyed creating this pagoda, and I'm very happy with the results.  Once I broke the process down into smaller parts, it didn't seem so daunting.  A little planning goes a long way when it comes to making these projects!  

I'm equally delighted to share the tips I discovered while creating the pagoda, and I hope they're helpful to you.  If you have any questions or additional tips to add, tell me about it in the comments.  I'd also love to see your creations, so leave a link!  Thanks so much for taking the time to read my tips!

Have a Crafty Day!

Items used:
Make The Cut!
Silhouette Cameo
Spring Blossoms SVG Kit
American Crafts Cardstock
Sunny Day Collection by SEI
 

Saturday, August 1, 2015

Tips for Tackling the Pagoda from SVGCuts-Part 1

SVGCuts, Make The Cut, Silhouette Cameo, 3D, papercraft, scrapbooking, tutorial
Did you guess correctly?
If you read my last post (from 3 months ago!) you may have gotten a clue that the pagoda was my craft in progress!

You've  gotta love the many 3D paper projects Mary at SVGCuts.com has designed.  She really outdid herself with the pagoda from the Spring Blossoms SVG Kit, and when I saw it I knew I had to make it. Then I started thinking about how many pieces there were, and I got so overwhelmed I almost gave up. Just figuring out what paper to use for each piece might be a project in itself!

After taking a deep breath, I thought: What do you do when a project seems too big to handle?  You break it down into smaller, more manageable parts.  This made me breathe easier, and if you've ever felt this way, take a deep breath and read on for tips that will help you successfully tackle the pagoda, or any large 3D paper project.

I've broken up these tips into three phases: choosing papers, cutting, and assembly. The assembly phase will be posted tomorrow, so as not to overwhelm you!

Phase One: Choosing Papers
  • Use the K.I.S.S. (Keep It Simple Stupid) method. Stick to one patterned paper collection.  Doing this makes putting patterns together a no brainer since they're all meant to go together.  The only other paper you'll need are solids that match the colors in the patterned paper.
  • Your solid paper should be a strong cardstock.  At least 80lb.  American Crafts and Bazzill cut well and are sturdy.
  • Watch Mary's assembly tutorial before you choose any papers.  This may seem backwards, but seeing the pieces and where they will go helps you decide which paper to use on which piece.
  • Consult the PDF included with the project files. Each of the pieces are grouped together in the PDF by color.  This will aid you in knowing which pieces should be the same color.
  • Scale your patterns appropriately.  The larger the piece, the larger the pattern can be on the paper.  Use smaller scaled patterns for the smaller pieces.  (On my pagoda I used a large flower pattern for the roof panels and smaller patterns on the side panels).
  • Remember, there is no right or wrong!  This is not a test, so unleash some of your creativity when deciding what goes where. (I have a lot of trouble remembering this!).
  • Label your papers with the SVG file name they will be used for with sticky notes.  This avoids confusion later on when you're cutting and it will help you remember if you have to put your papers aside before you go to cut.
Phase Two: Cutting
  • Make sure you have a sharp blade in your machine and sticky mats on hand.  This seems obvious, but I've certainly started projects without even considering this!  There is nothing more annoying than being in the middle of a project and getting awful cuts because your blade is dull or your paper isn't sticking to the mat.  You don't want to have to cut something more than once.
  • Having two mats on hand can make your workflow quicker.  You can be removing shapes or applying paper on another mat while other pieces are being cut in your machine.
  • Organize your cuts in your software.  For this project I used my favorite cutting program Make The Cut.  I put all the cuts that were the same color together on the same layer.  If I needed more than one sheet per color I placed the shapes on multiple layers.  I then placed the layers in order from the heaviest paper weight to the lightest and cut them accordingly.  This keeps the need for changing settings on your machine to a minimum.  I also labeled each of the layers with the appropriate paper color to avoid any confusion about which paper to use.
  • As you remove your shapes from your mat, put them in a sealable plastic bag.  How many times have you lost a piece and had to cut it again?  This is especially true for the smaller pieces as they are easily lost.  It's also helpful if you have to leave your project temporarily because life gets in the way.  (Of course that never happens when you're crafting!).
Phew! So far, so good.  You've got your papers picked out, your shapes imported and organized in your software, you've cut them, and now they're neatly stored and ready to assemble.  It's time to take a breather!

Do you have any questions about any of these tips?  Please let me know.  And if you have anything to add to this list, I'd love to read them in the comments!

Tomorrow will be Phase Three: Assembly. See you then!
Items Used:
Silhouette Cameo
American Crafts Cardstock
Sunny Day Collection by SEI

Have a Crafty Day!   


Friday, November 21, 2014

Quick & Easy Cards Using Doodlebats from Lettering Delights

Lettering Delights, doodlebats, dingbats, autumn, thanksgiving, cards
DB Foliage
What are doodlebats, exactly?  If you don't already know, doodlebats, or dingbats as they are also called, are a font that you install on your computer that has pictures for characters instead of letters.  I find I don't use these as much as I should, so I've made some simple cards using some doodlebats from Lettering Delights.  You can also find many on the internet for free.

Using Make The Cut, I created an 8.5 x11 inch rectangle to make a template to create two 4.25 x 5.5 inch cards.  Next I double clicked on the doodlebat image (much easier than having to figure out which letter corresponds to which image), resized it and put it where I wanted it on my template.
Make The Cut, Lettering Delights, Card
Once your cards are set up it's time to print.  If you want to be extra sure it will print correctly on your particular printer, go to File>Print Options then check 'show paper on mat'. This is how it will look:
Make The Cut, Lettering Delights, Card, Printing
For my printer (Epson Artisan 835), I found that choosing the borderless option made true 4.5 x 5.5  cards, which is what I wanted.  Once the cards were printed, I scored down the middle of the paper to create the fold, then cut the paper in half to separate them.  I rounded the corners for a finishing touch.


Here are some of my cards:
DB Giving Thanks & DB Thanksgiving Art

DB Giving Thanks

DB Foliage & DB Greeting Goodies

DB Giving Thanks & DB Thanksgiving Art
I really had a bit of fun making these!  I think I prefer the colored ones to the black ones, but those could be used for the kids to color.  These cards are so quick, they'd be a real time saver if you had to do a bunch, or you could print them out ahead of time and have a card whenever you needed one.

This is just one way to use the doodlebats on your computer.  What other ways can you think of?  I think I may have a few more up my sleeve.  Until then...

Here's what I used:
Make The Cut Software
DB Giving Thanks (Free for Nov. 2014 at Lettering Delights)
DB Thanksgiving Art
DB Foliage
DB Greeting Goodies
LDJ Thankful ('Autumn')
Pristina ('Give Thanks')
American Crafts White Cardstock  

Put those doodlebats to use and Have A Crafty Day!


Sunday, July 13, 2014

Hangin' at the Doghouse!

I'm hangin' at my house, with my dog Molly.  SVGCuts came out with a Victorian Row House cut file in their Parkside Row SVG kit.  I just bought the DCWV Limoncello stack, with you guessed it, a dog print.  What else could I do, but make a doggy hangout?
SVGCuts, Silhouette Cameo, Make The Cut, Dog, American Crafts, Core'dinations
Woof!  Every dog needs a place to hang!
This house was so much fun to make!  The most difficult part was figuring out which paper to use for the many different cuts in this file.  Fortunately Mary at SVGCuts organizes the files by color which helps a lot.  You can also change things around if you want to make it your own!  I plan to make a few more versions of this (Halloween, Christmas, etc.), and now my daughter wants one for her room!  Guess I'll be busy.   If you enjoy making 3D paper projects you really should check out SVGCuts.com, they've got some creative stuff to make!

Here's what I used:
Make The Cut!*
Parkside Row SVG Kit
DCWV Limoncello Stack
American Crafts Cardstock
Core'dinations Cardstock

Woof!  Have A Crafty Day!
*I'm an affiliate for Make The Cut! because I love it and you will too! 


Sunday, February 23, 2014

Free SVG Site and A Paris Themed Shadowbox Frame

Hello there.  I know it's been a while.  That's what happens when I get my car back after over a year of having to share it with my husband.  That means he drove it and I stayed home.  Hey, whoever makes the money gets the freedom and the car, right?  Well, last week that finally came to an end.  You could say I went a little nuts and made sure I was out every day since it was such a novel thing for me to do.  Of course I made visits to my local craft stores.  Hobby Lobby was my first stop, then Michael's and A.C. Moore.  Ahhh, sweet freedom.  Amidst all that, I did create a few things.  Some were Valentine related, and the frame I made could fall into that category, but it's really a gift for my daughter who I happen to love very much.  The cool part is where I got the frame from, but more on that later.  Take a look:

SVGCuts, Ideogram, Silhouette Cameo, Silhouette Studio DE, Jessica Sprague, Echo Park
Name and face concealed to protect the innocent.
It's a shadowbox frame using the Be Mine digital papers and elements by Echo Park. The rose is from the Crush On You Boxes SVG kit from SVGCuts.  A side note about that rose: I had to cut it three times before I put it together to form a satisfactory rose.  I don't know what it was, but I had such difficulty getting it to look right!  Originally the paper was darker, more like the darker circles on the patterned paper, but after cutting it two times out of that I had no more.  I had to settle for the lighter color.  The black trim is from Michael's and it has its own adhesive which made it a snap to put on.  I had a little trouble making those corners look right, but I think they turned out ok, just don't check under that rose!  Here's a close up of that difficult rose:
SVGCuts, Crush On You Boxes, rose, Echo Park, Jessica Sprague, Silhouette Studio DE, Silhouette Cameo
Your eyes are fine, it's the camera that's out of focus!
Not the best picture, but the best I could do.   Now about the frame itself.  I learned about this site called Ideogram from this post at CleversomedayIt's pretty neat.  You put in your measurements for one of the twelve available templates and out comes an SVG file you can cut with Make The Cut!, SCAL, Silhouette Studio DE(SSDE) or any software that cuts SVGs.  I used SSDE to print and cut this frame by dragging and dropping the digital paper on to the frame template.  In fact, I laid out the whole thing in SSDE which made it so easy to envision the final result.  One thing I noticed is if I used inches, the frame would not import at the proper size, but if I used centimeters it did.  It's not a big deal if it comes in small, all you have to do is resize it while maintaining the proportions.  

By the way, my daughter loved the frame since she loves all things Paris.  I can't wait to make more of these frames for my other children, they'll make sweet birthday gifts (well, they would if my other children were girls, but since they're boys they'll probably not appreciate them much!).  You really should check out this site, and thanks to Kay at Cleversomeday!  I noticed they added a heart box too, it looks really cool!  I love getting things for free, don't you?  Let me know what you make!

To make the frame I used:
Silhouette Cameo
Silhouette Studio DE
Be Mine Digital Paper by Echo Park
Be Mine Digital Element Pack 2 by Echo Park
Crush On You Boxes SVG Kit (rose)
Celeste's Cutesy Corner Elements SVG Collection (corner on photo)
American Crafts Cardstock (white for printing)
Core'dinations Cardstock (rose)

Now go to Ideogram and Have a Crafty Day!

Friday, January 31, 2014

A "Fishy" Card: Is It Two Lost Soles Or Sole?

Hi there.  Maybe you could help me out with a little grammar dilemma since I'm no master of the English language.  When I saw this cutting file with two fish in a fish bowl from Lettering Delights, a song started playing in my head.  You know the one, it goes like this:  "We're just two lost souls swimmin' in a fish bowl, year after year.... it's by Pink Floyd, and it's called "Wish You Were Here". I wondered, how could I make this into a punny card?  (And is "punny" even a word?).  I'd heard of sole fish, but I wanted to make sure they really existed.  I consulted google, and yes, there is a type of fish called sole (yeah, I think everybody already knew that, except me!).  I was all set.  Wait a minute, I thought, is it sole or soles when you're talking about two of these type of fish?  I didn't want any one to think I was talking about two feet, but I figured people would get it anyway, so with reckless abandon, I made this card using Silhouette Studio DE (SSDE):
Lettering Delights, Hooked on you, Silhouette Cameo
Does that sound right to you?  Are we feet or fish?
I was so pleased with how it turned out, but the issue of whether or not I was making a fool of myself almost prevented me from posting it here.  So I took a risk.  Isn't that what life's about?  If anyone reading would care to offer an answer, I'd love to know, but I can't say it'd change my mind about making this card!
 
To create the front of the card I had to give dimension to the frame to make room for the beads.  To do this, I made an inset shape of the frame and cut it out six times.  I glued each shape together and then glued them to the card base:
Hey, what are those green things down there?
It didn't matter if the stacked shapes were perfectly lined up since the frame I placed over them covered them up:
Hey, this fishbowl is kinda nice, maybe we're not lost!
I used the sketch feature, set on continuous, to sketch on the frame (this was inspired by Jin's card), and then I cut a piece of acetate and glued it to the back of the frame before adhering it to the front of the card.  If you'd like you can check out the other card I made using the sketch feature in this post.

In SSDE I used print and cut to create the card base.  To align the front and inner sentiment I used center to page. I printed the front of the card, turned the paper over, put it back in my printer and printed the inside.  CAUTION: Take note of which end of the paper went into the printer first.  You MUST put the same end that went in on the first printing, in for the second time, or this will happen:  
Lettering Delights, Zoodle font, Silhouette Cameo
Don't let this tragedy happen to you!!
I took the paper out of the printer and couldn't remember which way I'd put it in, so I guessed.  Oops.  I'd like to blame it on son number 3, who happened to walk in and talk to me at that very moment, but I take full responsibility, seriously, son, it's not your fault.  To prevent this in the future, I'll draw a little arrow on the paper to indicate which end I put in first (hopefully I'll remember to do that!).  Has this happened to you?  I hope not.  Now I've got to figure a nifty way to cover this up so I can give it to my husband who loves Pink Floyd as well.  Any ideas?  Leave a comment and let me know!

Supplies I used:
Silhouette Studio Designer Edition
Silhouette Cameo
Silhouette Black Sketch Pen
American Crafts White Cardstock
Green Seed Beads
Hooked on You Cut It Set
LDJ Zoodle Font

Thanks for checking out my "Two Lost Soles" card, and Have A Crafty Day!
 

Saturday, December 14, 2013

Christmas Tree Card with Lettering Delights

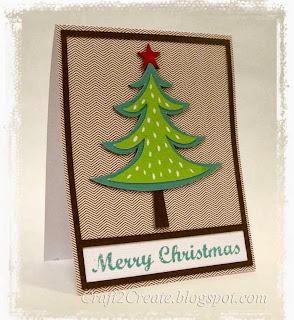
One of my favorite things to do is use Silhouette Studio Designer Edition (SSDE) to apply textures to card bases and shapes.  It's the only reason I decided to buy a Silhouette Cameo since I already had a cutting machine.  So here's a card I made using an image and digital paper from Lettering Delights.  It's very simple to create and if you don't want to go through the print and cut process it's easy enough to cut the card base on a paper trimmer.
Lettering Delights, Claus Applause, Silhouette Cameo
For this card I created a 4.25x11 rectangle for the base.  For a shape to apply the paper to I created another 4.25x5.5 rectangle.  I made sure this rectangle was set to no cut since I only wanted to print the shape.  I filled this shape with patterned paper from the Claus Applause paper pack and put it above the card base. I love doing this because it not only saves ink by leaving the back side of the card blank, but I think it looks more professional.  I then created the smaller rectangle (3.925x.810) for the sentiment and colored it white and placed it above the card base.  I selected the type tool and typed in Merry Christmas, sized and colored it.  The brown frame was created by yet another rectangle 4x5.25 and sizing two smaller rectangles on the inside.  To make the open space I went to Object, Modify, Subtract.  This frame was cut twice and glued together to add a little dimension.  Next I cut the tree in colored cardstock at the imported size which is 4".  I wanted a little dimension for the tree so I made a .20 inset of the base layer and cut this from cereal box.  If I had made the inset any larger it would have made the shape two pieces because of the narrow distance where the tree meets the star.  I would have liked the inset shape a bit smaller, but you can hardly notice it and this method is much easier than using foam tape to pop it up.  To cut the card base I did use the print and cut method because I just like doing it!  There you have it, a very simple Christmas card!  Thanks for looking, and don't forget to let me know what you think! 

Items used for this card:
Silhouette Studio DE
Silhouette Cameo
Core'dinations Cardstock (green,blue green, red)
American Crafts Cardstock (white card base for printing)
Bazzill Cardstock(brown frame)
Claus Applause Cutset  (on sale until 12/22/13)
Claus Applause Paper Pack (on sale until 12/22/13)
SNF Cheer Squad (font) (on sale for $1!)
(I am not an affiliate for LD or ScrapNFonts)

Monday, December 9, 2013

Santa Stamp Card Print and Cut

I have to say I love the Little Ho-Ho-Ho-ligans Accents cutset Lettering Delights came out with last year.  I haven't used it too much until now.  I made the stamp from the cut file and turned it into a card using Silhouette Studio (SS).  At the time I made this card I did not have the designer edition so I had to create a PNG file in Photoshop using the pdf included with the set before importing it into the program and tracing.  Check it out:

While I had the image in Photoshop I decided to play around with the background and changed it to one of the papers in the Little Ho-Ho-Ho-ligans paper pack.  It is very simple to do using the magic wand tool and cut via copy to create separate elements from the image.  Then you can recolor them however you want!!  Fun, fun, fun!  I also added the Merry Christmas sentiment there.  After importing into SS I added the 5 and the cent symbol using a tutorial from Under A Cherry Tree.  I then print and cut the stamp image.  For the base of the card I print and cut as well and as you'll see in the next pictures I added some images and a sentiment to the inside of the card.  This was also easy to do using the center to page feature in SS.  Because there are no layers in the software, you must have two separate files open for the front and inside of the card. The center to page feature allows you to line everything up on both sides when you print.


Of course using center to page is not the most efficient use of paper (unless you can fit more than one card), but when you want to put something on the inside it is the best way to do it in this program.  To put the card together I adhered a piece of white craft foam under the stamp image to pop it up a bit and it was done!  The card measures approximately 5"x6.25". Well, that wraps it up!  A simple and quick card using a cute santa stamp!  Let me know what you think and thanks for stopping by!  Just keep crafting until next time!  Here's what I used to make the card:
Silhouette Studio Software
Silhouette Cameo Cutting Machine
White American Crafts Cardstock (very good for printing on if you like texture on your prints)
Little Ho-Ho-Ho-ligans Accents Cut It Set
Holiday Hugs Garland Cut It Set (lights)
Little Ho-Ho-Ho-ligans paper pack
LD Charming Bold (font-sentiments)
LD Funky Chunky (font-5 and cent symbol)


LinkWithin

Related Posts Plugin for WordPress, Blogger...