Showing posts with label Echo Park. Show all posts

Friday, April 3, 2015

Quick Easter Digital Layout Using SVGCuts Files

Want to scrap a quick page of your Easter photos this year?  Want to make your cut files do double duty?  Try converting your cut files into digital format (.png), clip some paper to them, and put together a page in no time!  The easiest way I've found to do this is to get cut files from a page that's already been laid out for you, and Mary at SVGCuts has done just that.  I chose to use the scrapbook page from Poplar Street Tulips to create this layout of Easter 2010.
SVGCuts, Echo Park, Digital, Layout, Easter, Lettering Delights, Poplar Street Tulips, Photoshop
Easter cuteness!
To convert the .svg files I imported them into Make The Cut(MTC), and exported them as .png so I could use them in Photoshop.  There are other programs that will convert files, such as Inkscape, you can even do it in Silhouette Studio, but I find MTC to be the most convenient.

Once the files were in Photoshop, I arranged them on a 12x12 layout just as Mary did.  I clipped some Easter papers to some of the shapes, and applied a glitter style to the egg, the background lace, and the trim at the top of the photo frame.

Since the frame did not have shapes to clip the photos to, I created them using the rectangle tool in Photoshop.  They were sized slightly larger than the openings in the frame, placed underneath the frame, and the photos were clipped to them.

Next I added some drop shadows and two elements not in the SVGCuts file but from the digital collection I used.

And there you have it, a layout that took me under an hour, and that includes the time spent converting the files and deciding what photos and paper to use.

As much as I love making things with paper, when it comes to getting layouts done, I really like going digital.  And when the layout is already done for you (thank you Mary!), it's super fast!  

Making your cut files do double duty as clipping masks makes buying templates unnecessary and stretches your crafting dollar!

So, what do you think?  Have you already done this with your digital scrapbooking?  Would you like to learn more about it?  I'd love to hear, so please leave a comment!

Have a Crafty Day and a Happy Easter!

Items used:
Make The Cut!
Photoshop
Easter Mini Theme by Echo Park
Poplar Street Tulips SVG Kit
LD Those Kids (font-2010)

I'm an affiliate for Make The Cut! and SVGCuts because I LOVE them and you will too!


Wednesday, April 1, 2015

April Calendar

Happy April Fool's Day!  Can't say I'm the sort of person who likes to play jokes on people, nor do I care to have one played on me, so I rarely participate in the festivities of this day.  Of course, with April comes more spring like weather, and that means rain.  Rain to provide ample water for the beautiful flowers.  I've already got daffodils in my yard, courtesy of whoever lived here before me, since I didn't plant them.  And what do you need for rain?  The same thing my April calendar has plenty of, clouds!
digital, calendar, photoshop, april, clouds, spring, rain, Echo Park, Splendid Sunshine, Aishart Extended
Rain, rain DON'T go away, keep watering the flowers!
I actually don't mind the rain with the warmer temperatures.  I can't wait to see the flowers bloom!

To make the clouds for the calendar I selected a cloud from the background paper using the magic wand tool, right clicked, chose layer via copy and filled the cloud with white.  Next I duplicated the cloud several times and lined them up to form the grid.  I also now have the cloud shape that I saved as a .png file for future use.

I chose not to line up the numbers since I wanted them to look random, like they were floating on the clouds.  This made creating the calendar much quicker. 

The raindrops are actually another paper from this collection, I just selected the white background with the magic wand and deleted it, then I changed the blending mode to multiply.

So, what do you think, should the rain go away or stick around?  Let me know what you think!

Hope your day isn't too tricky and Have a Crafty Day!

Items used:
Photoshop
Splendid Sunshine Collection by Echo Park
Aishart Extended (font-days, month, events)
LD Woodland (font- numbers)
 

Tuesday, January 13, 2015

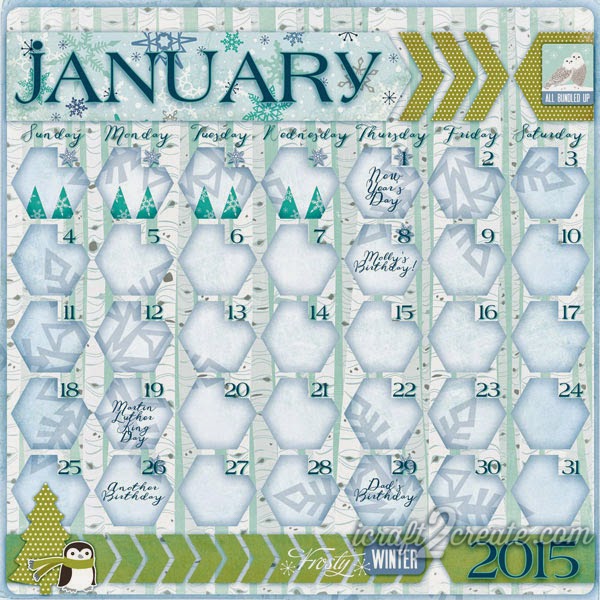
A Calendar for January

I know it's been too long since I was here last, so let me wish you a very belated Merry Christmas and Happy New Year!  Instead of crafting and blogging I've spent a lot of time getting the chaos creative clutter in my craft room under control.  Since creating digitally only requires the space my computer takes up, I was still able to finish my January calendar.
Digital, Photoshop, Calendar, January, 2015, Winter, Echo Park, Keepin' Cozy, Layout
Chilly!
You might guess that it was verrrry cold when I made this calendar.  In fact, in the twelve years I've lived in my area I've never experienced such low temperatures!  I feel lucky though, as we've not had any snow yet.

I made the template for this calendar back in December using Make The Cut.  I used the basic shapes that are included in the software to create the chevrons and the hexagon grid.  After exporting everything to png, I imported the shapes into Photoshop and clipped some papers from the Keepin' Cozy collection from Echo Park to them.  I created the numbers for the days the same way I created them for my December calendar.  I find it to be way more efficient than doing it in Photoshop.  Making templates ahead of time in Make The Cut also makes the process faster.

I'd love to find an even quicker way to design and create my calendars!  I did come across a site called timeanddate.com, which will create some cool calendars you can use to create a planner or even hang on a wall.  Of course you can't incorporate your own papers and such, but they do offer a lot of options to customize them, and it's free.  I like free.  I'll definitely be using them to create a planner for this year.

Do you like to make your own calendars or are you content to buy them at the store?  Let me know what you think, I'd love to hear your ideas!

Here's what I used:
Make The Cut! Software
Photoshop
Keepin' Cozy Collection from Echo Park
LD Handwritten Greetings Font (Days, events)
LD Hot Betty Font (Month, numbers)

 Keep warm and Have A Crafty Day!

Sunday, November 9, 2014

November Calendar with Reflections Fall by Lori Whitlock

November, the month of gratitude has arrived.  What are you thankful for?  It took me a little time to make this calendar, as I started out using a totally different set of papers than what I ended up with (I thank my very honest daughter for that! LOL).  So without further ado, I present my November calendar.  (Normally I don't speak like Shakespeare, I'm just in that sort of mood!)
Lori Whitlock, Photoshop, Digital, Calendar, Reflections Fall, Aaron Script, November, Autumn, Fall, Thanksgiving


As I mentioned, due to my daughter's honest opinion about the paper I started with to make this calendar, I changed up everything.  I'm glad I did.  I love the browns and the elegant feel of this paper by Lori Whitlock for Echo Park.

I used my own grid from my August 2014 calendar and resized it a bit to fit on this page.  To make the flourishes of the paper go on top of the lower left square and the borders I used the magic wand tool to select the flourishes, then right clicked and chose layer via copy.  Voila!  The square and borders are "sandwiched" between the paper and the flourishes.

I took the opportunity to use Aaron Script, a font I purchased at Mighty Deals a while back but hadn't used.  I love the elegant feel of it, and I didn't even use the extra swashes that came with it.

So that's my elegant November calendar, hope you enjoyed it!  Try using the magic wand tool, and see what you can do!

Supplies Used:
Photoshop
Reflections Fall (Element Pack 1 & Paper Pack)
Aaron Script (font)
Arial (font) 

Have a Happy November and Have a Crafty Day!

Friday, August 8, 2014

Calendar Day: Summer Shines On

Wow.  How could the last real month of summer be here so quickly?  August is upon us and thankfully, summer is still shining on in my neck of the woods.  Have you done everything you wanted to do this summer?  I sure haven't, but there's still time, so I've got to get to it!

My digital calendar for August is all about the sunshine and that warm summer feeling.  I created my own template for it in Make The Cut!, saved it as a PNG file and clipped papers to it in Photoshop.  Take a look:
Echo Park, Summer Bliss, Summer, August, Calendar Day, Photoshop, Digital, Gioviale font, Make The Cut
Keep on shinin' on, Summer!
I love the colors of this paper designed by Lori Whitlock for Echo Park.  And yes, I bought it at the One Buck Wednesday Sale at Snap Click Supply Co., where I've bought most of my digital supplies, until recently.  I've since discovered another place I heard about on the SVGCuts Facebook page.  It's called Sassy Designs, and it's where I purchased the "wave" template in the upper three squares of my calendar.  This site has tons of digital paper as well as design elements, album templates, frames, and plenty of freebies.  The last sale everything in the store was .25, and I've read there have been sales where everything was only .12!  Then one day there was a deal where you could get unlimited downloads until the end of December for $25!  Of course I jumped on it, and now every time I go there I feel like I've died and gone to heaven!  If you've never been there you MUST go!  Yeah, I guess I'm a little excited. I just love finding awesome deals!

Supplies used:
Make The Cut! software
Summer Bliss Paper Pack 1
Summer Bliss Element Pack 1
Gioviale font by Laura Worthington
3 Waves Layered Border from Sassy Designs
 
So, that's about it for this calendar day.  I hope your summer keeps shining on and Have A Crafty Day!

 (I'm an affiliate for Make The Cut!, because I love it and you will too!)  

Sunday, February 23, 2014

Free SVG Site and A Paris Themed Shadowbox Frame

Hello there.  I know it's been a while.  That's what happens when I get my car back after over a year of having to share it with my husband.  That means he drove it and I stayed home.  Hey, whoever makes the money gets the freedom and the car, right?  Well, last week that finally came to an end.  You could say I went a little nuts and made sure I was out every day since it was such a novel thing for me to do.  Of course I made visits to my local craft stores.  Hobby Lobby was my first stop, then Michael's and A.C. Moore.  Ahhh, sweet freedom.  Amidst all that, I did create a few things.  Some were Valentine related, and the frame I made could fall into that category, but it's really a gift for my daughter who I happen to love very much.  The cool part is where I got the frame from, but more on that later.  Take a look:

SVGCuts, Ideogram, Silhouette Cameo, Silhouette Studio DE, Jessica Sprague, Echo Park
Name and face concealed to protect the innocent.
It's a shadowbox frame using the Be Mine digital papers and elements by Echo Park. The rose is from the Crush On You Boxes SVG kit from SVGCuts.  A side note about that rose: I had to cut it three times before I put it together to form a satisfactory rose.  I don't know what it was, but I had such difficulty getting it to look right!  Originally the paper was darker, more like the darker circles on the patterned paper, but after cutting it two times out of that I had no more.  I had to settle for the lighter color.  The black trim is from Michael's and it has its own adhesive which made it a snap to put on.  I had a little trouble making those corners look right, but I think they turned out ok, just don't check under that rose!  Here's a close up of that difficult rose:
SVGCuts, Crush On You Boxes, rose, Echo Park, Jessica Sprague, Silhouette Studio DE, Silhouette Cameo
Your eyes are fine, it's the camera that's out of focus!
Not the best picture, but the best I could do.   Now about the frame itself.  I learned about this site called Ideogram from this post at CleversomedayIt's pretty neat.  You put in your measurements for one of the twelve available templates and out comes an SVG file you can cut with Make The Cut!, SCAL, Silhouette Studio DE(SSDE) or any software that cuts SVGs.  I used SSDE to print and cut this frame by dragging and dropping the digital paper on to the frame template.  In fact, I laid out the whole thing in SSDE which made it so easy to envision the final result.  One thing I noticed is if I used inches, the frame would not import at the proper size, but if I used centimeters it did.  It's not a big deal if it comes in small, all you have to do is resize it while maintaining the proportions.  

By the way, my daughter loved the frame since she loves all things Paris.  I can't wait to make more of these frames for my other children, they'll make sweet birthday gifts (well, they would if my other children were girls, but since they're boys they'll probably not appreciate them much!).  You really should check out this site, and thanks to Kay at Cleversomeday!  I noticed they added a heart box too, it looks really cool!  I love getting things for free, don't you?  Let me know what you make!

To make the frame I used:
Silhouette Cameo
Silhouette Studio DE
Be Mine Digital Paper by Echo Park
Be Mine Digital Element Pack 2 by Echo Park
Crush On You Boxes SVG Kit (rose)
Celeste's Cutesy Corner Elements SVG Collection (corner on photo)
American Crafts Cardstock (white for printing)
Core'dinations Cardstock (rose)

Now go to Ideogram and Have a Crafty Day!

Monday, February 3, 2014

Calendar Day...And A Tidbit About Clipping Masks In Photoshop

Ready for Spring yet?  I most certainly am.  Too bad we've got to get through February, and perhaps most of March, before hints of Spring start to show.  That good old groundhog in Punxsutawney, Pennsylvania saw his shadow, which means six more long weeks of winter, ugh.  One holiday that helps ease my winter blues is Valentine's Day, (I think it might have something to do with chocolate) and my calendar for the month is all about it.  Instead of the usual calendar grid, I created rows of hearts for the days and clipped paper to them.  Using clipping masks is one of the most basic things to do in Photoshop, but I think it's tons of fun.  Take any shape you have and make it look the way you want.  This adds value to your cut files because you can convert them into PNG files using Make The Cut! and use them as clipping masks.   Check out how I did this in my calendar below:
Photoshop, Digital, Echo Park, Clipping Masks, Carina Gardner, SVGCuts, Valentines
Hearts A Plenty!
Underneath "February 2014" is a notebook shape that started out as an SVG file from SVGCuts.com.  I imported it into Make The Cut! and saved it as a PNG file.  This is necessary since Photoshop will not import SVG files.  I imported the PNG file into Photoshop and clipped some notebook paper to it by putting the paper above the shape and pressing CTRL+ALT+G.  Make sure your paper is completely covering the shape, it helps to magnify what you're doing to be sure.  Depending on the size of your shape you may want to scale down your paper.  You can move the paper layer separate from the shape layer to get the look you want.  When you're all set, press CTRL+E to merge the two layers together.  You now have your paper in the shape of the notebook paper, pretty cool.  The heart shapes for the days and the pink mat underneath were already PNG files I'd purchased.  The cool thing about those is if I decide I want to cut them, I can convert them into SVG files using Make The Cut! as well.  Now that's thrifty in my book, but then again, I most definitely am not the queen of thriftiness (just ask my husband).  So what do you think?  Have you tried this already?  If not, give it a go and have some fun!  Let me know how you do!

Here's what I used to make my calendar:
Make The Cut! software*
Photoshop
Love Story Paper Pack 2 by Echo Park (Valentine papers)
Love Story Element Pack 2 by Echo Park (Journal cards)
Be Mine Element Pack 2 by Echo Park (XO Border)
Babysitting Adventures Paper Pack by Lettering Delights (Notebook paper)
LD Charming Bold Font
LD Remington Portable Font
LD Jub Jub Font
Notebook SVG from Miss Baker's Classroom SVG Kit
Carina Gardner Photo Masks MEGA Collection 

Whew, that was a long list!  Keep warm, and Have a Crafty Day!

*I am an affiliate for Make The Cut!  Thanks for your support!
 

Thursday, January 2, 2014

Happy New Year!... and My January Calendar

I hope you had an excellent New Year's and you're ready to start a new year!  My main goal this year is to craft more, post more and shop less!  Of course I'll do that tomorrow since I just finished buying a ton of files at Lettering Delights!  Today was the last day of their site wide sale where everything was $1-$2 and on top of that there was a coupon.  I can't resist a sale like that.  The only thing I have a problem with is having so many files to choose from!  As I downloaded my newly purchased files I noticed all the other files I already have and realized I haven't used a lot of them.  I really want to put them to better use, hence the goal to craft more and shop less.  Do any of you have this problem?  I can't be the only one!

Now on to my January calendar which really didn't make much use out of those files, although I did use one to create the grid for this calendar.  I did something I've never done in Photoshop, create a grid with the marquee tool.  The calendar grid from Lettering Delights was a bit thick and I wanted something cleaner looking.  So I imported the grid and drew on top with the marquee tool using the LD grid as a guide.  I think it worked out pretty well.  Of course I added shadows to the January and 2014 using the method I did a tutorial on in this calendar day post.  I really didn't add much else to this calendar as I thought the paper did most of the work.  I liked it so much I didn't want to cover it up!  Snowy and chilly, just what January should be like!  The funny part is in my neck of the woods I haven't seen much snow!  I am truly grateful for that!
So there you have it!  I think I really like how basic this one is.  What do you think?  I did create another one with paper behind the grid, but I think I like this one the best.  Thanks so much for taking a look and reading my rambling!  Feel free to leave a comment!  In case you're interested, here's what I used for this calendar:

Echo Park Winter Wishes Paper Pack 1
SNF Honeycrisp font (January and numbers)
SNF Chantilly Lace font (2014)
Hip Hip Hooray Everyday Calendar cut it project

LinkWithin

Related Posts Plugin for WordPress, Blogger...