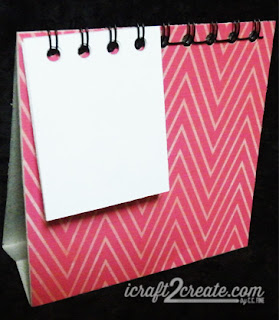
Showing posts with label Cinch. Show all posts

Tuesday, August 11, 2015

Flip Calendar Day: August

calendar, flip calendar, DIY, papercraft, 3D, Bo Bunny, DCWV
Happy August!

An August calendar with a new twist, at least for me.  Since I'm in flip calendar mode, I thought I'd make one for my monthly calendar.  I used to print one 12"x12" calendar every month, but it seems like I'm always running out of ink in my wide format printer!

First, I created my calendar in Photoshop at 12"x12".  Once it was completed I reduced the size to 8"x8" which made it possible to print on my regular size printer.
Digital calendar

I then proceeded to make the flip calendar much the same way as the countdown calendar I made.  Since it's much bigger than that one, I had to use two 12"x12" sheets of cardstock and glue them together to form the base as in these pictures:

calendar, flip calendar, 3D, papercraft, DIY
I scored each sheet at 8.75", folded them and glued one flap on top of the other.  Using my Cinch binding machine, I punched binding holes in the top.  I put patterned paper on the front and backside of the base.  To sturdy up the base I put additional pieces of the same colored cardstock on the interior of it.  Then I bound the top with O rings.  This is how it looks:
calendar, flip calendar, 3D, papercraft, DIY, Bo Bunny, DCWV
I used a removable 8"x8" page protector for the calendar, so I can take it off at any time, or add another if I wish.

I decided it need a little something more, so I added some embellishments and a removable journal card.  The journal card is held on with magnets as I did on my countdown calendar.
Magnets work like a charm!
I can add important dates on the journal card, or anything I want. When the month is over I'll stick it inside the page protector with the calendar.

Thanks for checking out my calendar!  I've made one more, but I'll take a break from flip calendars....for now.

Let me know if you plan to make one of these.  They really are a lot of fun! If you have any questions, feel free to ask in the comments.

Items used:
Photoshop
Cinch Binding Machine
Zutter movable 8x8 page protector
.75" Zutter O Rings
DCWV Sweet Tangerine Stack
Bo Bunny Key Lime and Barefoot&Bliss Digital Collections
Milkshake Font by Laura Worthington

Have a Crafty Day!
 

Sunday, August 9, 2015

Back 2 School is Coming! (Perpetual Countdown Flip Calendar Tutorial)

Back to School, Fall, Autumn, Advent calendar, flip calendar, count down calendar
Already?
I know, I know.  The kids don't want to hear it (at least mine don't!).  It's that time again. Time to get back to the books and get your study on!  With this in mind, I thought I'd create a countdown, so the kids can mentally prepare and be ready bright and early on that first day.

This flip calendar is a spin off of the Christmas advent flip calendar I wrote about in this post.  The main difference between them is the size.  I chose to make this one much wider so it would stand up better.

Creating the base:

You'll need a 5"w x12"h piece of sturdy cardstock (I used Silhouette chipboard) for the base.  Score it at 5", 6" and 7".  Cut two pieces of patterned cardstock to 5"x5".  If you have a binding machine, you can punch your holes in the base and the patterned pieces, then glue the patterned pieces to the base.  You can always use binder rings to bind the top of your base if you don't have a binding machine.
Back to School, calendar, countdown, fall, autumn, school, papercraft, DIY
Score at 5", 6", and 7"

Creating the numbers and rectangles:

Create 20 rectangles sized 2.25"wx2.875"h with numbers 0-9.  I used Photoshop to make a grid with guidelines for cutting.  Any software such as Silhouette Studio or Make The Cut can also accomplish this task.  When placing your numbers be sure to leave enough space at the top of your rectangles for binding holes.  I could not fit all of the numbers on an 8.5x11 page, so I put the nines on another sheet. 
Back to School, Fall, Autumn, calendar, flip calendar, advent calendar, school, Photoshop
Make sure to print and cut two sets and don't forget number 9!
Back to School, school, autumn, fall, calendar, countdown, papercraft, DIY

Create your "weeks until" rectangle sized 4.75"wx1.75"h in the same way, then print and cut it out.

If you don't want to go through the process of creating a computer generated document, just cut your rectangles with your paper trimmer and add stickers for the letters and numbers.

Punch your binding holes into the numbered rectangles, making sure not to put too many at a time into your binding machine.  I found out the hard way that doing so will jam your machine!

You may want the ability to use days or months instead of weeks until an event.  To solve this, put a magnet on the front of your calendar and another on the backside of the front to hold the bottom piece in place.  Surprisingly, the magnets will hold it quite well.
Back to School, Fall, Autumn, calendar, magnets,school
Two magnets holding bottom piece in place.  Yeah, I know, terrible picture!
Since you may want this to be an all occasion countdown, cut a rectangle of chalkboard vinyl or dry erase material and put it on the "weeks until" rectangle (you can also laminate it) so you can write whatever occasion you want, then adhere it to the base using magnets or glue. 
Back to School, Fall, Autumn, school, calendar, chalkboard vinyl
How about Christmas?
Then again, you could make the entire rectangle from the chalkboard vinyl and forget about the magnets.  Yeah, that might be easier, huh?

Binding:

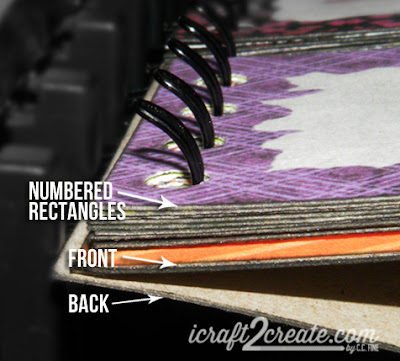
If you're using a binding machine, place the back on first, then the front, and finally the numbered rectangles as shown in the picture below.  Make sure your numbers are in the correct order, but even if they aren't, this is a perpetual calendar so it's not the end of the world.
Back to school, school, fall, autumn, calendar, countdown, papercraft, DIY
  
Back to School, school, calendar, flip calendar, Fall, Autumn, tutorial
The "ugly" side

Bind your O rings according to your machine's directions.  

Now it's time to enjoy your new countdown flip calendar!  But don't enjoy it too much, your kids won't appreciate it!

Here's how mine turned out:
Back to School, countdown, flip calendar, calendar, cinch, autumn, school, chalkboard vinyl, DIY
Sorry to break it to you kiddos!
You could use this countdown for any occasion, not just for taunting your kids with a back to school reminder!

I had a lot of fun creating this back to school countdown, and I hope you enjoy making one too!  If you do, please leave a link in the comments.  I'd love to see it!  Got questions?  Ask in the comments and I'll do my best to answer.  Thanks for sticking with me and checking out my countdown calendar!

Items Used:
Photoshop
Silhouette Chipboard
Textured Basics Paper Pad by Craftsmith
Georgia Pacific White Cardstock
1/2" O Rings by Zutter
Cinch Binding Machine
Bebas Neue (font)

Have a Crafty Day!
 

LinkWithin

Related Posts Plugin for WordPress, Blogger...